This is a new thing for this blog. I've read other bloggers' reviews of Big 4 pattern company collections for years, but I've never felt drawn to post one of my own until today, when I saw the new Simplicity collection.
The new collection contains 20 patterns, most of which feature new branding. It looks like Simplicity might be taking some cues from indie patterns in both branding and style with this release. I wondered whether they might also be modernizing their fit standards (aka less ease), but it seems that is pretty hit or miss.
I'm not going to talk about all the patterns in the release, because that would be an insane blog post. I'm just going to review some of the pattern collection's standouts (good and bad).
Showing posts with label Simplicity. Show all posts
Showing posts with label Simplicity. Show all posts
Tuesday, December 3, 2019
Wednesday, November 6, 2019
October 2019
October was nuts. We had a birthday, a trip to the Amazon and our 12th anniversary. I had been in a bit of sewing rut, but this month pulled me out of it. I made a few things for myself and sewed a lot for my kids, which was one of my goals for this year.
Sunday, October 20, 2019
Leopard print Simplicity 1059 dress

I sewed a second Simplicity 1059 dress - a swishy, drapey, dramatic sleeve-y leopard print confection that is really, really hard to photograph.
Monday, August 12, 2019
Simplicity 1358 Sleeveless Maxi Dress Review
You know how sometimes your style is altered by those around you? I'm that way when I spend time with my sisters-in-law on my husband's side. I always feel as though they are a little more fashion-forward than I am. In the summer, my uniform is skirts and tank tops. But sometimes when we are together I can feel a little frumpy - particularly if we are going out. They always wear cute dresses and I'm usually in the same old stuff I wear every day. We had a family reunion at the lake last week, and this year, I was determined to be fashion-ready for any occasion.

Monday, July 22, 2019
More Simplicity 1887 shorts

I do love a good TNT, so it shouldn't be too surprising that I'm here blogging my eighth and ninth makes from the Simplicity 1887 pattern. In 2016, I used the pattern to make four pairs of shorts and two skirts (see here and here). Those items constituted the backbone of my summer wardrobe for three years. Now none of them fit (and some are looking a bit raggedy for wear), including the black linen skirt I made from the pattern earlier this year.
Monday, July 15, 2019
Graphic black and white Simplicity 1059

I put the Simplicity 1059 "Jiffy" sewing pattern on my to-buy list years ago after seeing Mimi G's velvet version. I didn't have plans to make it up any time soon, and I certainly had never planned to sew it in a woven. But back in June, during my sewjo explosion, I was casting about for something [else] to make for my trip home. I came upon the pattern while rifling through my pattern bin and decided to give it a whirl.
Monday, July 1, 2019
June 2019

This month was a little bit insane. Fueled both by the need for clothes that fit AND the knowledge that I was going to be away from my machines for all of July and August, I sewed 15 16 17 garments (19 20 21 if you count both pieces of the four two-piece sets that I made). I completed another item off my Make Nine list- the Liana Jeans - twice.
Wednesday, January 30, 2019
The sea of seven colors (and Simplicity 1887)

I'm a beach girl. Always have been. I was lucky to grow up in a family that vacationed regularly. Not anything fancy; we always drove, and it was pretty common that all seven of us would squeeze into one hotel room. But we got to vacation, nonetheless. For a period of my young life, we would alternate our summer destinations - one year by the sea, the next up in the mountains. At some point I convinced my siblings to make a full court press, begging for beach vacations only. We were successful at some point in my junior high school life, and I've been going to the Outer Banks (on the Atlantic Ocean) almost every year ever since.
Monday, April 30, 2018
April 2018 and my MMM pledge
Are you participating in Me-Made May? This will be my third year, and I've been looking forward to it for months. I feel very prepared for it this year. Like last year, I'm pledging to wear at least one me-made item every day. Additionally, I am going to try not to repeat any outfits during the month (repeating garments is ok, and necessary). I'm looking forward to the challenge, and am planning to post on IG, but probably not every day. I will post a few round-ups here. As for sewing, I'm currently redrafting my Ginger Jeans pattern to address my back leg wrinkles, and am hoping to sew up a pair or two during May.
But enough about May (at least, until tomorrow). This post is about April. It was a busy month with Easter, two weekend trips and my older daughter's spring ballet show, but I still managed to knock out a few things, including a shirt for my husband, which has been on my sewing list since we bought the fabric for it in October.
PROJECTS COMPLETED

1) Art Museum Trousers for G to replace a pair he had recently outgrown. I sewed a size 4 lengthened by 1" with enclosed welt pockets and no belt loops. I used 33" of pinstriped denim plus scraps of airplane quilting cotton. Sewed everything in 3 hours, including time to interface my welt pieces. Ended up using a hem allowance of 3/4", so I should have lengthened by 1.75" instead of 1". Width is perfect. Completed 4/4
2) Bow tie for G using this tutorial and scraps. Completed 4/4.

3) Another OOP Lisette Portfolio/Simplicity 2245 for me, using 1.89 yards of 50" wide fabric bought last July. This dress is evidence that sometimes it's good to stash fabric without a purpose. I had actually envisioned this dress in a vivid emerald green linen and kept putting it in my cart, when I remembered this cut of designer fabric that I had bought without purpose. The linen/viscose blend fabric is cool and breezy with a gorgeous drape that was better for this dress than the linen I had originally chosen. Stash win! Completed 4/10. Blog post coming soon.

4) Fairfield Button-Up as a birthday gift for J. I used 2.5 yards cotton shirting purchased in October to make this shirt. Completed 4/22. Will be blogged soon.
5) Four bodice muslins for a pattern test I'm doing. 88" used of an old sheet. Completed 4/23.
I also took in the waist and hips of my houndstooth Alberta Street skirt, which has been bothering me all year because it was just too big in those areas. It took me less than an hour and I feel like I have a whole new item of clothing in my closet.
FABRIC PURCHASES
4/21: I bought 5.33 yards of fabric to make elf costumes for my girls and my niece. I'm not sure whether they will be helping me with the sewing or not. All of it was bought at Joann's - one cut of sale yardage, and the rest from the remnant bin.
FABRIC IN/OUT
Fabric in: 5.33 yards
Fabric out: 7.75 yards
Fabric in YTD: 60.58 yards
Fabric out YTD: 48.23 yards
But enough about May (at least, until tomorrow). This post is about April. It was a busy month with Easter, two weekend trips and my older daughter's spring ballet show, but I still managed to knock out a few things, including a shirt for my husband, which has been on my sewing list since we bought the fabric for it in October.
PROJECTS COMPLETED

2) Bow tie for G using this tutorial and scraps. Completed 4/4.


4) Fairfield Button-Up as a birthday gift for J. I used 2.5 yards cotton shirting purchased in October to make this shirt. Completed 4/22. Will be blogged soon.
5) Four bodice muslins for a pattern test I'm doing. 88" used of an old sheet. Completed 4/23.
I also took in the waist and hips of my houndstooth Alberta Street skirt, which has been bothering me all year because it was just too big in those areas. It took me less than an hour and I feel like I have a whole new item of clothing in my closet.
FABRIC PURCHASES
4/21: I bought 5.33 yards of fabric to make elf costumes for my girls and my niece. I'm not sure whether they will be helping me with the sewing or not. All of it was bought at Joann's - one cut of sale yardage, and the rest from the remnant bin.
FABRIC IN/OUT
Fabric in: 5.33 yards
Fabric out: 7.75 yards
Fabric in YTD: 60.58 yards
Fabric out YTD: 48.23 yards
Wednesday, March 14, 2018
Simplicity 1563 pajama pants

Pajamas are one of those things I have never been able to bring myself to spend money on. I know, it's stupid, I could easily pick up a cute pair at Marshall's without breaking the bank. But for years, my go-to night look has been a pair of ratty pj pants (bought by my mother some 10 years ago) or ratty shorts with on old, equally ratty t-shirt that I stole from my husband. It's not a cute look.
Tuesday, August 2, 2016
A palooza of woven tees


And I am so happy with the fit. It is just right through the shoulders and bust - with no gaping neckline, no pulling in the chest - and enough ease in the tummy and hips to be comfortable but enough shaping to avoid looking tent-like. I'm really, really happy with the results of the work I put into adjusting this pattern.

After I made the white blouse, I cut another out of the last of a cut of double-faced gauze that I previously used to make a dress for Z. I did this one with a shirt-tail-shaped hem and faced the neckline and sleeves with bias made from the same brown linen from my Simplicity 1887 shorts. I was overzealous in lowering the neckline, though, so I ended up having to put in a modesty panel. I also messed up while cutting the back, so I had to cut it in two pieces and seam it.

I will be honest, although this top is very comfy and goes well with three of the Simplicity 1887s in my closet, I don't love how it looks. I'm really annoyed with myself about the low neckline - I don't like how the modesty panel breaks up the plaid, but the gauze is shifty enough that I wasn't even going to try to match the pattern. I sewed the darts properly and tied them off instead of backstitching. I also pressed well over the edge of my ironing board. But they are still pointy - I feel like the fabric is to blame here. And I don't really like the shape of the neckline. I wasn't even going to post photos of it, but since I do wear it fairly regularly, my blogger conscience compelled me to include them.


I did, however, have a heck of a time getting halfway-decent photos of this top. My most successful shoot took place just after a steamy rainstorm, and my camera lens fogged right up. But these photos show the shape of the top the best, so try not to squint too hard.


This is my "I'm going to melt because it's 200% humidity out here" face.
Tuesday, June 28, 2016
A couple of woven tees
I'm usually a knits girl, but this summer my wardrobe seems to be crying out for woven tees. I couldn't find exactly what I wanted, so I knew I'd be altering whatever pattern I bought. I picked up a copy of Simplicity 1377 (now out of print) on eBay and got to work.
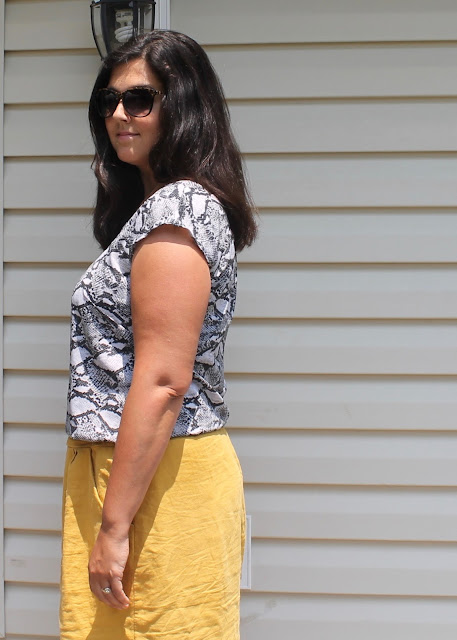
I traced out view D and made a few flat pattern adjustments. I started with size 14, which corresponds with my high bust measurement (my full bust and everything else put me at a 20). This top doesn't have a bust dart, but it's easy to put one in - I did so while also performing a 1/2" FBA. My F cup actually would justify a larger FBA, however, after consulting the finished measurements I figured 1/2" would be big enough. While I was slashing my pattern, I lowered the neckline 3" and did a 1/2" forward shoulder adjustment. I also flared the side seams out starting from the rib cage and ending 1" wider than the pattern pieces on both the front and the back for a total of 4" increased at the hem. Then I did a quick-and-dirty muslin, and based on that, I lengthened the top 1.75" and lowered the neckline another 2".
It sounds like a lot, but all the adusting, cutting and muslin sewing only took about 90 minutes. And it was WELL worth the effort. I didn't get a perfect fit on my first try, but I did get something very wearable.
Although the fit was good, I had a lot of trouble binding my neckline on my first fashion fabric version of this top. I chose to finish the neckline with an invisible bias finish, which I've done a few times before. I did everything I was supposed to - staystitched, understitched, clipped. Even so, I had to rip out the binding three times due to awful gaping. By the time I was done, I had clipped the seam allowance at 1/4" intervals all the way around the neckline. I also cut some of the width off the binding and ended up finishing it at 1/4". It still wasn't perfectly flat, but I just folded a pleat over into the neckline and called it good. I'm going to blame the fabric here, because I did not have nearly the same problems with my second version. An Instagram consult yielded suggestions to shorten the binding, which didn't occur to me in the moment but which I will keep in my back pocket the next time I make this top in a drapey fabric.
This particular fabric is a remnant bin find at Joann's that I haven't been able to locate on their web site. I'm guessing it's polyester. It is very light and drapey and nice to wear but really not so nice to sew - I wouldn't dare sew it into anything with more seams than this top!

Let me just take a quick moment to talk about fit and exalt the humble FBA. Look at the back of this blouse. This is a size 14 - the upper back is out of the envelope as I didn't start flaring my side seams until my ribcage. Simplicity says this fits a 36" bust and drafts for a B cup. My full bust measurement is 41". I have ample assets in the front but I'm not crazy unproportioned or anything like that. And yet the upper back of the size 14 fits me perfectly. High bust size selection FTW! I would have been utterly disappointed if I had cut the size 20 the size chart indicated for me. FBAs are always worth it.

Immediately after finishing the gray top, I cut out another, this time in a long-hoarded voile. While sewing it, it dawned on me that perhaps the neckline was just too wide. I made a 1/4" pleat before attaching my binding and then I adjusted the neckline correspondingly in my pattern piece for future makes. I only had to sew my neck binding on once this time - as with the other top, I cut 1" binding to finish at 1/4" and I made sure to clip my seam allowance every 1/4".
Where I had just clipped the sleeve hem and folded it over and topstitched on the gray top, here I cut out more binding and bias-bound the sleeves too. It wasn't painful in this stable cotton. I do find the voile top a bit roomy in the shoulders - especially when I sit down. I don't have this problem with the drapey poly - fabric choice makes all the difference.
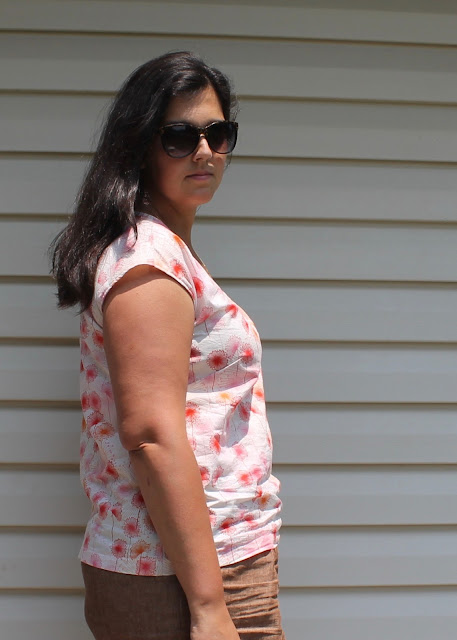
I'm currently sewing a white cotton lawn version of this top - this time I've incorporated a v-shaped neckline cut-out and am french-seaming the whole thing. I'm waiting for a FabricMart order to arrive later this week and in it there is a cut of rayon challis that is destined to be my fourth version. And so my summer uniform turns out to be brought to you by Simplicity - 1887 for the bottoms and 1377 for the tops.
Another note, these are my first pictures taken using the camera remote I recently received for my birthday. I have to say I love this thing, though it does have an annoying 4-second lag between when I hit the button and when the shutter snaps. But yay for no longer having to corral my kids and husband to take pictures.

I traced out view D and made a few flat pattern adjustments. I started with size 14, which corresponds with my high bust measurement (my full bust and everything else put me at a 20). This top doesn't have a bust dart, but it's easy to put one in - I did so while also performing a 1/2" FBA. My F cup actually would justify a larger FBA, however, after consulting the finished measurements I figured 1/2" would be big enough. While I was slashing my pattern, I lowered the neckline 3" and did a 1/2" forward shoulder adjustment. I also flared the side seams out starting from the rib cage and ending 1" wider than the pattern pieces on both the front and the back for a total of 4" increased at the hem. Then I did a quick-and-dirty muslin, and based on that, I lengthened the top 1.75" and lowered the neckline another 2".

It sounds like a lot, but all the adusting, cutting and muslin sewing only took about 90 minutes. And it was WELL worth the effort. I didn't get a perfect fit on my first try, but I did get something very wearable.
Although the fit was good, I had a lot of trouble binding my neckline on my first fashion fabric version of this top. I chose to finish the neckline with an invisible bias finish, which I've done a few times before. I did everything I was supposed to - staystitched, understitched, clipped. Even so, I had to rip out the binding three times due to awful gaping. By the time I was done, I had clipped the seam allowance at 1/4" intervals all the way around the neckline. I also cut some of the width off the binding and ended up finishing it at 1/4". It still wasn't perfectly flat, but I just folded a pleat over into the neckline and called it good. I'm going to blame the fabric here, because I did not have nearly the same problems with my second version. An Instagram consult yielded suggestions to shorten the binding, which didn't occur to me in the moment but which I will keep in my back pocket the next time I make this top in a drapey fabric.
This particular fabric is a remnant bin find at Joann's that I haven't been able to locate on their web site. I'm guessing it's polyester. It is very light and drapey and nice to wear but really not so nice to sew - I wouldn't dare sew it into anything with more seams than this top!

Let me just take a quick moment to talk about fit and exalt the humble FBA. Look at the back of this blouse. This is a size 14 - the upper back is out of the envelope as I didn't start flaring my side seams until my ribcage. Simplicity says this fits a 36" bust and drafts for a B cup. My full bust measurement is 41". I have ample assets in the front but I'm not crazy unproportioned or anything like that. And yet the upper back of the size 14 fits me perfectly. High bust size selection FTW! I would have been utterly disappointed if I had cut the size 20 the size chart indicated for me. FBAs are always worth it.

Immediately after finishing the gray top, I cut out another, this time in a long-hoarded voile. While sewing it, it dawned on me that perhaps the neckline was just too wide. I made a 1/4" pleat before attaching my binding and then I adjusted the neckline correspondingly in my pattern piece for future makes. I only had to sew my neck binding on once this time - as with the other top, I cut 1" binding to finish at 1/4" and I made sure to clip my seam allowance every 1/4".
Where I had just clipped the sleeve hem and folded it over and topstitched on the gray top, here I cut out more binding and bias-bound the sleeves too. It wasn't painful in this stable cotton. I do find the voile top a bit roomy in the shoulders - especially when I sit down. I don't have this problem with the drapey poly - fabric choice makes all the difference.

I'm currently sewing a white cotton lawn version of this top - this time I've incorporated a v-shaped neckline cut-out and am french-seaming the whole thing. I'm waiting for a FabricMart order to arrive later this week and in it there is a cut of rayon challis that is destined to be my fourth version. And so my summer uniform turns out to be brought to you by Simplicity - 1887 for the bottoms and 1377 for the tops.
Another note, these are my first pictures taken using the camera remote I recently received for my birthday. I have to say I love this thing, though it does have an annoying 4-second lag between when I hit the button and when the shutter snaps. But yay for no longer having to corral my kids and husband to take pictures.
Wednesday, June 22, 2016
All the Simplicity 1887s
I present to you ... a whole pile of Simplicity 1887s. There are a lot of photos, but there are also a lot of garments! And I guess we can call this pattern a TNT (yay!). After having sewn four pairs of shorts and two casual skirts in the last three weeks, my summer wardrobe is a lot more functional. I really only need several more tops and a cardigan or two, and I will have enough. The trick will be to stop sewing at that point, but I guess I could try to direct the sew-jo to other pursuits, like the quilt I need to finish and the three flower girls' dresses and three ring bearers' outfits I need to make for a November wedding. But I digress.
First up is this skirt, view D of the pattern, sewn up in a linen/rayon blend from Joann's. After having made the shorts twice, I knew that I'd want to make the size 16 (two sizes down from what Simplicity wants me to do) with an extra 3/8" added to the side seams.
First up is this skirt, view D of the pattern, sewn up in a linen/rayon blend from Joann's. After having made the shorts twice, I knew that I'd want to make the size 16 (two sizes down from what Simplicity wants me to do) with an extra 3/8" added to the side seams.


I also knew I'd need to install the elastic correctly. Recently I saw a photo of a stack of Simplicity 1887 shorts on Instagram and I realized that I had sewn my first two pairs the wrong way. Turns out that the elastic is supposed to wrap around the hips to the edge of the pockets instead of ending at the side seam. I was sewing my first pair pretty late in the evening, and the notches and where they wanted me to leave the waistband open didn't make sense to my exhausted brain, so I just did it the way I thought it should be done. But I was wrong, and Simplicity's way holds the shorts or skirt up a lot better than when I had the elastic only in the back. I did go back and redo the elastic on my orange linen shorts - yay for shorts that don't fall down! I found the skirt a little short for 5'8" me, so instead of turning up a 1.25" hem, I cut a self-fabric hem facing and applied it with a 1/4" seam.

I faced all the waistbands of the garments in this post with some scrap cotton instead of self-fabric. This linen/rayon is a tiny bit scratchy, and I also thought that the cotton fabric would help the waistband stretch less in the front where there is no elastic. I also interfaced the pocket openings with knit stay tape (because you have to stretch the pocket opening of the pocket, to the pocket opening of the skirt) and made sure to understitch the seams where the pocket is stitched to the skirt.
And the result of installing the elastic as instructed is a skirt that stays up even as the linen stretches out. I wore it all day (two days in a row, if I'm being honest) and it didn't fall down, not even when I weighed the pockets down with car keys and my iPhone. It's really a perfect summer skirt for running around with the kids. So after making it, I went back to Joann's and bought this fabric in three more colors. It was on sale and I had a coupon, making it $4.50 a yard. I had actually used it twice before and didn't really enjoy working with it. But this time around I've had no problems and I love a lot of the color options.

I have been reaching for the shorts I made a lot over the last two weeks (very surprising for someone who hasn't worn shorts since junior high school!) so I decided to make a couple more pairs. The navy shorts include the same modifications I made on my orange pair. In addition to those mods, I lengthened the shorts 1" and hemmed them as instructed by the pattern. I also sewed down the pleats about 2". I am not sure how much I like them sewn down; they are kind of giving me a "dorky camp counselor" vibe, so I might take the stitching out.
Somehow the shorts ended up an inch wider than the waistband. I think they probably stretched out during construction. I ended up having to put two 1/4" darts into the back to fix the problem and I think it improved the back view. I considered putting back pockets on this pair but didn't have enough fabric.

Then I made a pair out of this slub linen that I always seem to find in the remnant bin at Joann's. I am not sure whether it was the fabric or my cutting, but these ended up a little snugger than my other pairs. I also topstitched the pleats down on this pair. They are very cool to wear on a humid day, though, and I like how they pair with my green Lisbon cardigan.

And last, another skirt. I remembered to lengthen it 1" this time. I also stitched the pleats down. At this point, I had construction down pat and I was able to sew up this skirt in under two hours.


These photos were taken on my way out to dinner with my sisters. I really love this skirt and know that it is going to get a lot of wear (as with all the garments in this post). I have one more cut of the linen/rayon blend in a lovely deep peacock blue - I bought it thinking I'd make a skirt with it using this pattern, but I'm going to take a break right now. I have definitely gotten my money's worth out of this 80-cent pattern! Time to move on and make some tops.
Monday, June 6, 2016
Mom Shorts and a Plain White Tee
I have never worn shorts much. During the winter I live in jeans, and in the summer I almost always go for skirts. But there are times when one needs to wear shorts (like when doing nature walks and hikes outside in the steamy Virginia summer). And it is useful for those shorts to have pockets. So last week, I sewed some.
The pattern is Simplicity 1887, which I picked up for 80 cents along with a bunch of other patterns during Joann's Memorial Day sale. I actually bought it for the skirt, but it also includes these shorts and a pair of pants - all with a pleated front, flat front yoke and elasticated (or should it be elasticized? "Elasticated" has always sounded weird to me) back waist.

When I went to cut the pattern, I was dismayed to realize that I had bought the smaller size range. My measurements put me into a size 20 in Simplicity patterns, but my pattern stopped at 16. Luckily, it seems that these shorts run really big - many blogosphere sewists have gone down two sizes.
I went ahead with the size 16. On my first pair, I lengthened the shorts about 1.5" and sewed the side seams at 1/4" instead of 5/8".
The first pair is made of the last of a four-yard cut of Lisette dotted chambray from a few summers ago. This fabric has been cursed for me. Although I had four yards of it, all I have to show for them is these shorts and a baby dress I made last winter. That's because everything I have cut out of the fabric has totally failed.


I wouldn't call these shorts a failure, but if I had muslined them first I would have been able to fix the problems you can see in these photos - I think the wrinkles near my hips in the above photos are an indication that I needed more room for my booty.
And in the next photo you can see how the front rise sags because it is too long.

So before sewing the next pair, I made some adjustments to the pattern. I scooped out the back rise a bit, 5/8" at the deepest point. I also added 3/8" to my side seams so that I could take 5/8" seams again. Finally, I took 1" out of the front rise using this tutorial. It was really quite easy as well as effective, and has given me confidence to make more shorts or pants.

I forgot to lengthen my pattern piece on this pair, so I took a 1/2" hem at the bottom instead of 1.25" like the pattern instructs. I really would not be comfortable with the shorts any shorter than this. I almost added some crochet trim to the hems but decided at the last minute not to. I'm glad I resisted; the shorts will go with more tops this way and I think maybe my trim will be better used on a top. I'm wearing the shorts with another Kirsten Kimono tee that I made recently - it's a medium with a 5" FBA (!), graded out to the XL at the bottom.

I really like these orange shorts, but the fabric relaxes A LOT throughout the day. I wore them last week on a hiking outing with a homeschool group (and I received compliments on the outfit), but by mid afternoon they literally would not stay up and I had to change! I've been thinking about what to do about this, because I really like them. I also have another cut of this linen in a lovely mustard yellow that I was planning on using to make the skirt from the pattern. I think I'm going to sew some clear elastic into the seam at the top of the front yoke - and possibly into the bottom seam where the yoke meets the shorts - when I make the skirt. As for the shorts, I REALLY don't want to take them apart but if the clear elastic is a success I might do it. I guess I could also put in some belt loops. I'm not really a belt wearer though.

After the hike, while wearing the blue shorts, I went to pick up my niece and my sister told me that I looked "dowdy." Don't worry, my feelings aren't hurt - we have very different clothing styles. But I scrutinized these photos a bit more while finishing this post, and although pleated fronts are not usually my bag, I still think the shorts are cute. I guess it's possible that my style has veered off fully into "mom" territory without my realizing it, but you know what? I'm a mom. And I'm ok with looking like one.
Friday, May 1, 2015
More baby stuff
I sewed most of these clothes months ago when I was in super-nesting mode, but I left most of the knit items unfinished due to frustration with my machine's refusal to hem the thin jerseys. Bolstered by my knit sewing successes during KCW, I finally pulled them out and finished them. I had limited myself to stash fabrics (with a special emphasis on using up small scraps) for the gender-neutral newborn layette, and here is what I came up with. Fabric from Girl Charlee.


This t-shirt and pants both from the same Simplicity 5136 pattern. The pants (which are supposed to be 0-3 month size) look particularly huge so I don't know how they will fit for a newborn. This wasn't meant to be a matching set - again, stash remnants (almost all from Girl Charlee)! The hat pattern is my own.


This cloud fabric is a soft and comfy modal/cotton/lycra blend hat my machine really did not enjoy sewing.


These swaddles are from a free Lotta Jansdotter pattern. I made the owl print one first but it seemed small so I lengthened the pattern for the second swaddle. The outers are woven cotton prints and the inners are soft cotton knit.

My oldest loved swaddles, but the other two hated them, so I'm not sure how much use these will get.

Don't mind the wrinkles, they've been rolled up in a basket for months.

Wednesday, April 8, 2015
Mod shift dress for spring
I last left you with images of little sister's new dress for spring.
When it was older sister's turn to choose fabrics, she picked out a rose-print woven cotton pique, purchased for $4/yd during a FabricMart sale last year. I was curious about the fabric's lineage, and thanks to the magic of Google, discovered that it was from a Land's End dress line a couple seasons back.

It's funny, if I had seen this dress at Land's End, I would have thought "meh," and scrolled past it. I don't think the lines of the dress make the best use of the fabric. But when I saw the fabric swatch at FabricMart, I couldn't stop thinking about it until I had purchased it.
During my Google investigation, I also found a few projects using the same fabric, including this incredible ball gown. I think it is stunningly beautiful, so click over and have a look!
It took me a few days to figure out what pattern to use. Big sister is so skinny and the print was so big that I didn't want it to overwhelm her. Ultimately I decided on a simple silhouette.


As you can see, I did not achieve a perfect finish. Though the neckline does pucker slightly against the stitching, it now lays flat against the body when worn. Not so with my first attempt, which was poke-out city. I had to take it out and redo it, helped in large part by this great post from Grainline Studio. I had neglected to clip the neckline sufficiently the first time around, but another go-round with the scissors fixed the problem.


I searched for a photo of myself wearing the dress that I was thinking of when I sewed this, but I couldn't find one. However, I do still have the doll dress that my Babushka made to match. When I pulled it out (after the dress was all sewn up) I couldn't believe it - it was exactly the same dress with exactly the same construction. Granted, this construction was not at all difficult. I did have to modify the back opening after I opted out of the facings, and it makes me smile to know that I did it the same way Babushka did when she made this little doll dress.

A-line shape - check. Cool structured fabric (in this case cotton faille) - check.

Invisible bias neckline - check. Seamed back with simple button closure - check.

However, Babushka's bias-finished neckline and armholes didn't pucker at all. And she finished them by hand. I could have learned a lot from her.

When it was older sister's turn to choose fabrics, she picked out a rose-print woven cotton pique, purchased for $4/yd during a FabricMart sale last year. I was curious about the fabric's lineage, and thanks to the magic of Google, discovered that it was from a Land's End dress line a couple seasons back.
It's funny, if I had seen this dress at Land's End, I would have thought "meh," and scrolled past it. I don't think the lines of the dress make the best use of the fabric. But when I saw the fabric swatch at FabricMart, I couldn't stop thinking about it until I had purchased it.
During my Google investigation, I also found a few projects using the same fabric, including this incredible ball gown. I think it is stunningly beautiful, so click over and have a look!
It took me a few days to figure out what pattern to use. Big sister is so skinny and the print was so big that I didn't want it to overwhelm her. Ultimately I decided on a simple silhouette.
I got Simplicity 4927 at a thrift store for 50 cents. View A, with sleeves, looks very Becky Homecky to me. But View B, a sleeveless a-line shift, is a classic design that reminded me of the dresses my Babushka made for me when I was a girl.
The dress is simple enough - three pattern pieces if you don't count the facings. And I didn't. I wanted the dress to be cool and summery and facings felt a little fussy for that. I decided to try an invisible bias finish on the neck and arms instead.

As you can see, I did not achieve a perfect finish. Though the neckline does pucker slightly against the stitching, it now lays flat against the body when worn. Not so with my first attempt, which was poke-out city. I had to take it out and redo it, helped in large part by this great post from Grainline Studio. I had neglected to clip the neckline sufficiently the first time around, but another go-round with the scissors fixed the problem.
After it was all sewn up I decided that it needed something. I searched the stash and found some trim that I had picked up at the grocery store (yes) when we lived in Georgia. I think it suits the lines of the dress and the fabric perfectly, and it further reminds me of things my grandmother used to sew.
A big yellow button from the stash to complete the mod feel, and I was done.
I searched for a photo of myself wearing the dress that I was thinking of when I sewed this, but I couldn't find one. However, I do still have the doll dress that my Babushka made to match. When I pulled it out (after the dress was all sewn up) I couldn't believe it - it was exactly the same dress with exactly the same construction. Granted, this construction was not at all difficult. I did have to modify the back opening after I opted out of the facings, and it makes me smile to know that I did it the same way Babushka did when she made this little doll dress.
A-line shape - check. Cool structured fabric (in this case cotton faille) - check.
Invisible bias neckline - check. Seamed back with simple button closure - check.
However, Babushka's bias-finished neckline and armholes didn't pucker at all. And she finished them by hand. I could have learned a lot from her.
She would have loved the dress.
Subscribe to:
Posts (Atom)