A sewing blog about building a functional, cohesive handmade wardrobe, one garment at a time.

Tuesday, March 31, 2015

Teeny tiny baby diapers

I have always wanted to try sewing a newborn diaper stash, but it always felt very daunting.  When the girls were still in diapers, I made a pocket and a few fitteds using an ill-fitting self-drafted pattern.   The failure was enough to put me off the project for a few years.  While pregnant with little man, I bought the Darling Diapers Unlimited pattern and made a few fitteds, which worked much better.  So this time around, I used my nesting energy to sew a new stash.  (Although we have cloth-diapered all our kids since birth, I was certain #3 was our last so I gave everything away as he outgrew it.)

So here we are having to start from scratch.  Luckily, I now have a very good idea of what I want in a nb diaper stash:

* About a dozen prefolds, since they wash so easily and can go into the dryer and double as burp cloths.
* About a dozen fitted diapers, because fitteds+covers contain newborn poop the best.
* A few rise-adjustable double-gusset PUL covers (I like Thirsties Duo Wraps),
* A handful of pocket diapers for nights (these are also a Papa favorite).


I purchased the newborn prefolds you see in the left side of the drawer (Green Mountain Diapers, love them) because it's not really economical to make them yourself.  Everything else was made by me.


I kicked off my stash sewing by making a dozen fitteds using the Darling Diapers Unlimited pattern.  The pattern contains many variations - including sizes from tiny newborn and regular newborn up to toddler and options for pockets, fitteds, all-in-ones and covers.  There are options for front snapping, side-snapping and hook-and-loop closure.  If you like the fit it is the only diaper pattern you'll ever have to buy.


As my last two babies have been 8 and almost 9 pounds, I went for the regular newborn size.  It seems a little large to me but the couple I made for G fit him for a good long time, so I don't really mind if they are a little big to start. The fitteds themselves are each constructed of three layers of fabric - mostly bamboo fleece and organic bamboo velour, but a few have cotton print knit outers and one has a woven outer.  A few have hidden layers of hemp fleece.


There is an option for an umbilical cord snap-down but I only used it on the striped one.  All my kids have lost their cord stumps within a few days of birth so I figure that won't be a big deal.  The eagle-eyed might notice that my snap placement isn't the same on all the snap diapers.  This is because I have this issue with trusting diaper patterns' snap placement.  I have no idea why, but I always seem to think I can do it better on my own (and I never do).  At some point I should learn.


Each fitted has a lay-in soaker made of three layers of fabric - a combination of bamboo fleece, organic bamboo velour and hemp fleece.


I was pretty careful with my seam allowances, but even so it seems to me that the contour soakers I made are not going to fit well inside the leg elastic. We'll see, I guess, but it's a good thing I made some super-awesome double-gusseted PUL covers to contain the messes :)


I was planning to use the DDU pattern to make the covers, but the fitteds looked so big to me, I wasn't sure the newborn size DDU cover would actually fit over them.  And then I discovered this free pattern  for an adjustable newborn/small PUL cover, so I used it to make my covers.


After I'd made three, I decided they should be a bit longer, so I lengthened the pattern by 1.5" and added another set of snap sockets to make the green cover adjustable to three sizes instead of two.  I made the leg gussets using this tutorial.


I'm very pleased with the end result - they look just like the Thirsties Duo covers I used and loved for the other three kids.  They take about an hour to sew, start-to-finish, and they are so much cheaper to make than to buy (I think mine were about $3 each for materials, whereas the Duo covers run about $13 a pop).  All of this adds up to make them a very satisfying sew.

Next up was a half-dozen pocket diapers. We like using them at night for babies who don't wake as often (fingers crossed that #4 falls into that category) since they keep the skin drier than fitteds.


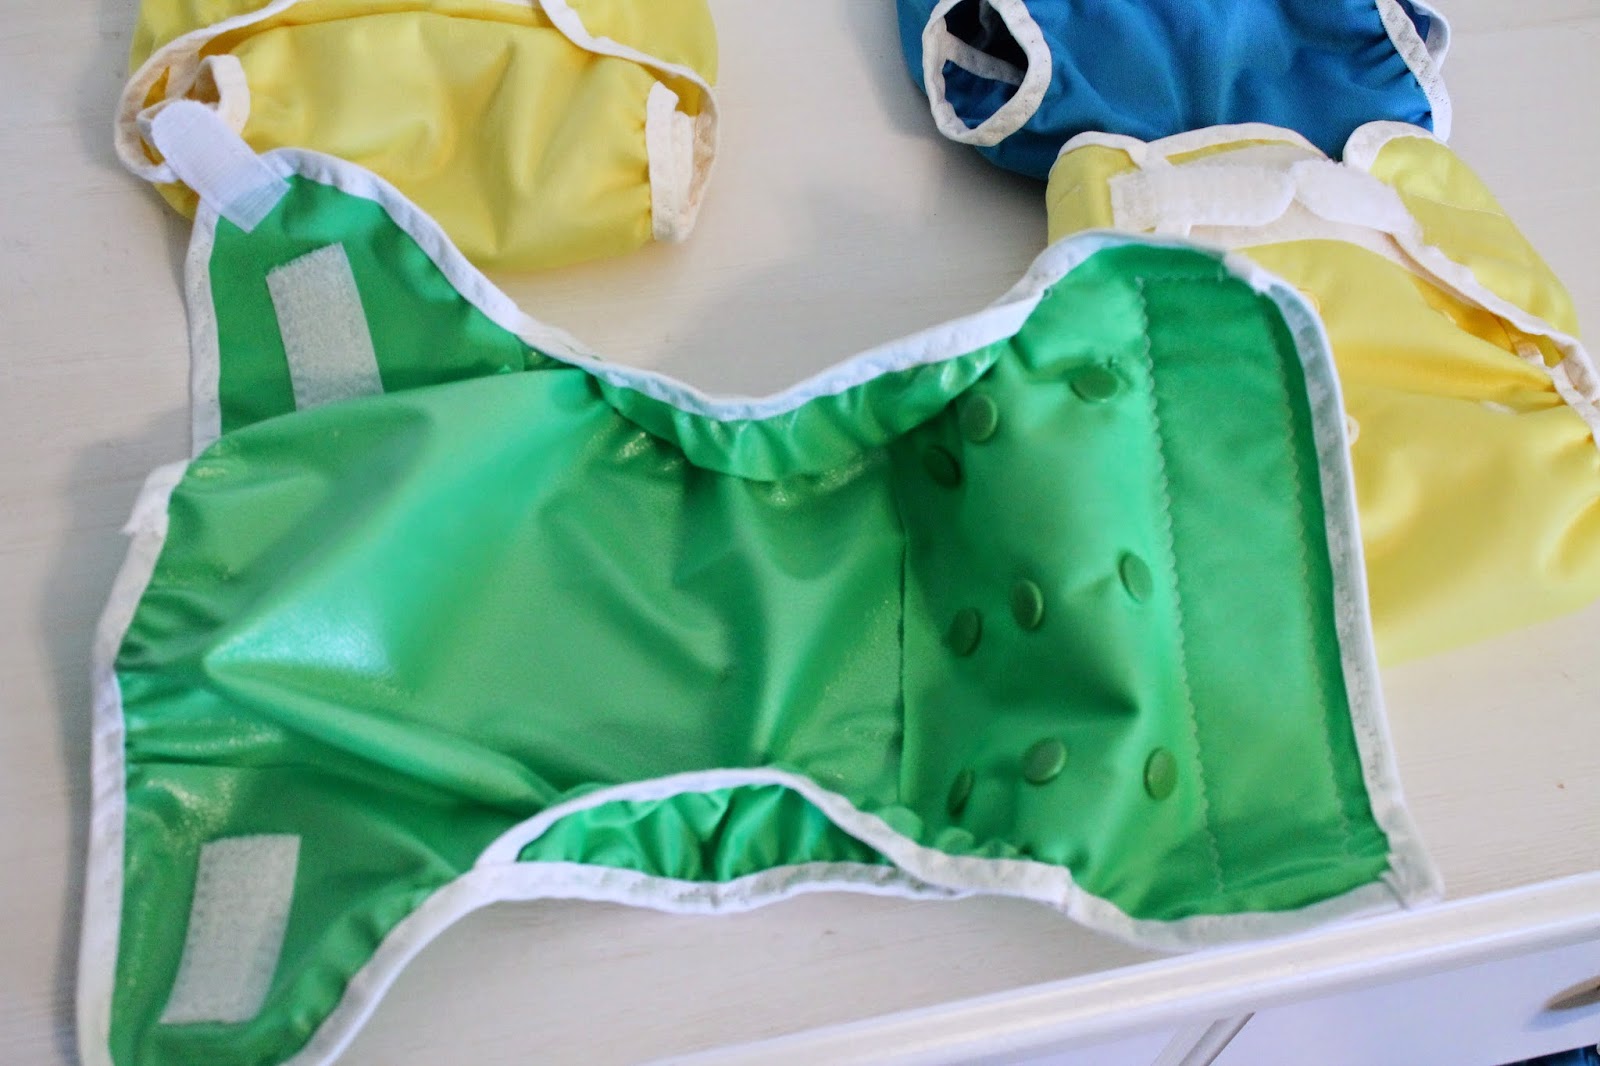
I tried going back to the Darling Diapers pattern for my pockets, but after I made one (the blue one with velcro closure), it looked really small and hard to stuff.  I used the regular newborn size with the rolling elastic option.  My fleece keeps rolling to the outside of the leg openings so I also worry it will wick.  Rather than fuss with the pattern I made the remaining five pockets nb/small sized using another free pattern from the prefold2fitted website.

I liked that they were size-adjustable and will fit longer.  Each pocket is made of one layer of PUL and one of microfleece.


You can see the size difference in the above photo.  The DDU one is nice and trim but it won't fit as long as the other one.

I opted not to fuss with a pocket opening that was cut or sewn into the micro fleece.  Instead I just folded down the microfleece in back to be like some bought pockets we have used and loved, and I added a little elastic on the micro fleece portion of the pocket opening as well as on the PUL side.


For inserts I used this free pattern from the same site.  I did double-petal soakers with each petal constructed of one layer of hemp fleece and one layer of microfiber.  I have some bought inserts made of that combination of fabric and I love them.  They are trim but very absorbent.


I had such fun sewing this stash (over a period of about three months) that I had to have a stern talk with myself once I had fulfilled our diapering needs.  It would have been very easy to go overboard and make a million more diapers!  What I made will be plenty.


I'm very happy with how everything turned out ... I hope they fit well!


Tuesday, March 24, 2015

Euro leggings

I am generally a frugal person.  Fabric shopping has been no exception.  I search out deals, buy things on sale, etc.  This has worked very well for me in general, except when it comes to knits.  With very few exceptions, I have found that you get what you pay for when it comes to knit fabric.  Big sister in particular loves to wear leggings, so when I make her a pair they get a LOT of use and I find out pretty quickly which knits hold up and which don't.  I have made a number of purchases from the usual knit suspects, and despite the popularity of some of these outlets I am sad to say I haven't had a ton of luck with the $6-$7/yard range of knits, at least not when it comes to leggings.  There has been a lot of pilling, awful fading of prints and holes developing quicker than it seems they ought to be.

I had been shy to try out the vaunted European knits because of their price tag.  But at Christmas I was treated to some fabric shopping and I used the money to pick up a few yards of Lillestoff and Stenzo cotton/lycra.  Though my girls are small enough that I can still get two pairs of leggings out of each yard of fabric, and though I have sewn no fewer than eleven pairs of Playtime Leggings without any trouble whatsoever, I was still terrified to cut into that fabric.  Because if I mess it up, that's $20 down the drain.  Told ya, I'm frugal.

But then I made yet another pair of leggings out of fabric that didn't look so good after a couple washes, and enough was finally enough.  So this week I screwed up my courage and cut into the Euro knits.


I knew my rose-obsessed girl would love this print from Stenzo.  I was a little nervous to use a print for leggings - the last time I used print knits for leggings, the pants looked a hot mess within a couple of weeks as the dye faded and held onto dirt like crazy. 


I made these in a size 3 with added length - the main legging piece was a 4 + 1" and then I added a 3" cuff at the bottom.  I chose to finish with a cuff because I have been having a lot of trouble topstitching knits on my machines lately.  I've tried ballpoint needle, stretch needle, double ball point, double stretch, zigzag, walking foot, stay tape, Wooly Nylon, etc., in short, all the usual suspects, with no luck.  My machine does condescend to stretch stitch (lightning stitch) on knits, however, I don't like how that looks on hems.  


The leggings fit well but she had a little trouble getting them on.  At first I thought that the 3 was too small but upon reflection I think it's that I needed to adjust the width at the bottom of the leg as I lengthened it, since the hem of the size 4 length actually hits at her calf, I should have adjusted that point on the pattern to be a little wider. Instead I just kept it the same width from there on down.  (I don't think I explained that too well, sorry).

In any case, I decided to go up to a size 4 for the next pair.  These have a more relaxed fit but they still fit her preference of "tight pants only."  I am not sure whether the 3 or the 4 is a better fit for her.  I almost feel like I should grade between the sizes for the next pair.  

This knit is a yarn-dyed Lillestoff stripe.  It is soft but substantial and I enjoyed sewing it.
For the waistband, I decided to try the RTW method of attaching the elastic to the top of the pant, then folding it over and topstitching through two layers of fabric and one layer of elastic.  I used a zigzag to topstitch and only had four or five skipped stitches the whole way around (this is a big victory since usually my machine won't zig or zag on knits).  Time will tell whether this method is any better than the casing method, but I did enjoy not having to sew a casing.  For some reason I really dislike sewing elastic casings on knits.


She loves both pairs of leggings and I still have some more Euro knits in my stash to try out - a Stenzo polka-dot print and a Lillestoff squirrel print I bought for baby things.  Perhaps a fabric-shopping conversion is about to take place!

Wednesday, March 18, 2015

Another reason I haven't been blogging ...

So ... there's a baby coming.  That's another reason I haven't been blogging - I was really, really sick for what seemed like forever (but was really just the first trimester).  Sewing made me want to puke.  Typing made me want to puke.  Puking made me want to puke.  Pretty much everything except, oddly, spinach salads for breakfast, made me want to puke.  Thankfully, I don't feel that way anymore.  Though, if we are being honest, I have been consuming far more Oreos than spinach lately.


After Christmas, I finally started sewing little baby things.  We opted not to find out the gender. We've had two surprise-at-birth girls and one found-out-in-advance boy, and we have found that we prefer not knowing.  This does, however, make sewing baby clothes problematic.  I have seen some wonderful examples of truly gender-neutral baby clothing (here and here, for example), but I was limited in my fabric choice as I had determined to sew all my baby clothes from stash.  And gender-neutral clothes often seem more boyish to me. It's horribly unstylish of me, but I know from experience that once the baby is born and I know who he/she is, I want the girls to look girly and the boys to look boyish.  It's just how I am.   (And as we I was positive the little man was our last baby, I gave away all our baby things - so we are really starting from scratch).  In the end I am pretty pleased with how these particular items turned out, but I guess the proof will be in the pudding if we have a girl ... will I want to dress her in them?


I sewed this bodysuit and pants of a double-faced gauze I bought on super-duper sale at FabricMart last year.  I used a different color way to make my second Late Lunch Tunic and it didn't hold up that well.  I think that was because that tunic somehow ended up a tad too small around the rib cage though it could be due to the fragility of the fabric.  Just in case it was the latter, for these items I sewed 1/2" seams on my sewing machine and then used the serger to sew a 3/8" seam for reinforcement.


I had quite a bit of difficulty getting the fabric in general, and the bias strip in particular, to behave.  I think in this fabric I should have cut a wider strip.  I ended up giving up and there are bits where the strip didn't get totally turned under.  I zigzagged those to prevent fraying but the inside neckline does not look so pretty.

Both items are size 0-3 months, but I lengthened the bodysuit to the 3-6 month length to ensure room for cloth diapers.  The fabric is so lovely and light and soft - it is perfect for baby summer wear.  Just don't look too closely at the topstitching.


To distract from the messy inside neckline, and also because I think it's funny, I used one of these strange twill-tape labels I got free with purchase from Land of Oh a couple years ago.  About half the labels say "Handmade," which of course makes sense and is useful.  But the other half say "Sunbonnet."  Underneath that it says something about handmade things being made by people with their hands.  Cracks me up.


I made a second set of pants out of this lovely striped linen I picked out of the remnant bin at Joann's a few years ago.  The pockets and waistband are also remnant-bin linen.  The top is fabric reclaimed from my only-worn-once July 4 Washi dress of frumptastic frumpiness.  I used the same striped linen for the neckline binding, and yellow KAM snaps.  The size 16 KAMs really are too big for the pattern (and they are a little tough to unsnap) but again, I was working from stash and I didn't have the right kind of snaps.


The pattern, as I had expected, is a well-drafted with clean details and thorough instructions.  The only view I didn't make was the jacket.  I'd like to make one in knit - though this will be a late spring/summer baby a cardi will come in handy for air conditioned spots - but I'm having a lot of trouble with knits on my machine these days so it will have to wait until I'm really motivated.