A sewing blog about building a functional, cohesive handmade wardrobe, one garment at a time.

Saturday, August 26, 2017

Four Fairfields on vacation

I was very busy the first two weeks in August, sewing up vacation button-downs for my brother, my father and my husband.  After my brother saw the bula shirt I sewed for J in June, he requested one.  His birthday was coming up, so we picked out two cuts of rayon fabric from Hawaii Fabric Mart. I did not want to make the Negroni pattern again because of the front facings, and I suspected that my brother would not be inclined to iron (spoiler alert, I have already been proven right).  I decided to try the Fairfield Button-Up (affiliate link) from Thread Theory.

Now here is where I mention that I could have saved myself a lot of annoyance if I had a) muslined and b) taken the time to really work out where the pattern was going wrong, fit-wise, before sewing three more of the shirts.  Because, although I like the pattern, and although I will definitely sew it again, I have come to the conclusion that this pattern is not just "slim-fit," but actually runs small.  Obviously a Hawaiian-type shirt calls for a more relaxed fit than a dressier shirt, but I think the sizing of the Fairfield is too tight even for a modern-cut dressy shirt.


I cut a size L for my brother's first shirt.  The size chart says an L fits a 42 1/8" chest, 37.75" waist, 45" hip.  My brother has a 42" chest and a 37" waist.  It should have fit well, but I had to forego flat-felled seams and sew the side seams - all the way up through the sleeve - with a 1/4" seam allowance to avoid it being super-tight.  I admittedly forgot to measure my brother's hip, but I had planned to do a split hem anyway, and his hips are not disproportionate to his chest and waist.  And as it turned out, the side slits were not optional, due to tightness.

We didn't try to button the shirt up all the way (in fact, I didn't even put a button at the top because I knew it would always be worn open), but you can see in the above photo from the way the fabric is pulling at the top button, that the shirt is too small across the upper chest despite the fact that my brother fits into the size range exactly.  That shoulder fit, though, is spot-on.  And he loves the shirt, and received several compliments on it from waitstaff at restaurants while on vacation.


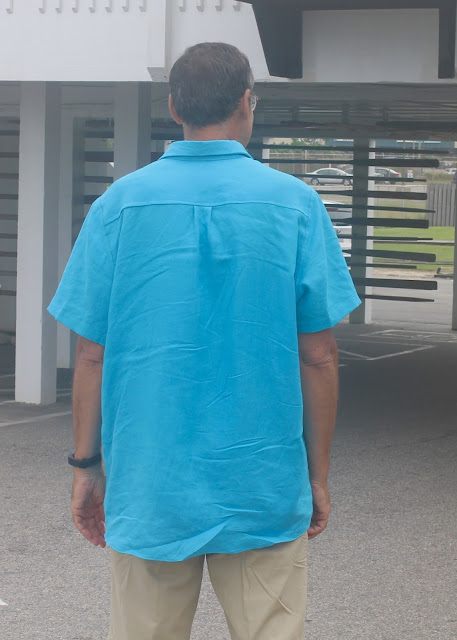
Next, I went to work on a shirt for my dad.  He is not a fan of anything even remotely flamboyant, and actually poked a little fun at my brother's fabric choices.  But after seeing the first shirt, he did mention that he might like a linen shirt for his birthday.  We chose a beautiful blue from Fabric Mart's designer-quality line.  (Fabric Mart is not to be confused with Hawaii Fabric Mart - two different sites/stores).  The fabric lived up to its name.  It is gorgeous - with a satisfying heft and beautiful drape - and lovely to sew.  I will definitely buy it again in the future.

Now here's where I'm stupid a second time - I didn't make a muslin for my dad's shirt.  I also really should have chosen a different pattern - my dad likes his shirts relaxed and I now knew this pattern was skin tight a slimmer cut.  I measured him, and he is 42-39-41 1/2.  The XL is supposed to fit a man of proportions 44 1/8-40-46 5/8. I cut the XL with an extra 2" of length (because my dad likes his shirts long as well as roomy), and added an extra 1/2" to the side seams on both fronts and back for good measure.


In any case, again, the fit was no bueno.  I couldn't even put the button placket together at the bottom, and my dad's hips are supposedly 5 inches under the XL hip measurement.  My dad said "I think I need about eight more inches across the shirt." I said "I can give you 1"."  And then I felt really badly because I hadn't given enough thought to sizing.  An inch extra of ease wasn't going to result in a shirt that he would feel comfortable in.  That night, I lay awake thinking what to do.  I ended up cutting 3" panels and inserting them at the side seams, all the way from the shirt hem to the sleeve hem.  I flat-felled all the seams.  This added about 4" of ease and made the shirt fit much better.  I was all ready to discuss the concept of a "design element" with my classic-style-loving dad, but his eyesight isn't great and I don't think he has even noticed the panels!


After I was done with that shirt, a little ragged but determined to finish the job, I went back to the second cut of rayon for my brother.  I forgot to jot down sizing notes while I was sewing it, and I'm typing up this post after two weeks of beachy bliss, so I don't remember exactly what I did.  I think I sized up to the XL everywhere except the shoulder, which I cut to a size L, because it was a perfect fit on the first shirt.  


Sizing up did the trick, and allowed me to flat-fell the seams.  You can see in the below photo that the upper chest/neck fits much better despite the fact that I kept the L shoulder.  And, yes, he proved me right on the ironing.  Although I presented him the shirt on a hanger, he decided it was better stored in a ball on the floor until he wore it to dinner ...


I used coconut-shell buttons on all the shirts in this post; after I exhausted my Fiji-sourced supply, I started looking for more on eBay.  I was surprised when I found them at Walmart while buying thread, but they look pretty much exactly like the ones from Fiji.  
 

I didn't think about how I was going to make a split hem whilst utilizing flat-felled seams until after the pattern pieces were cut, so I ended up fudging it with a bit of seam binding.  For a casual shirt, it worked fine.


On to the last shirt.

I hadn't planned to make J another shirt, but it seemed silly barbaric to order fabric from Hawaii and not even let him pick out a cut of fabric.  And then I had a week left before our trip, so, naturally, he had to get another shirt, too.  Having (finally) learned from my previous errors, I had him try on the shirts I had made for my brother and my father, and we decided to make him a straight size L despite the fact that his measurements place him squarely in the M size.  This worked well for him, and I was even able to flat-fell all the seams.  And after sewing three shirts in two weeks, I had his made, cutting to buttons, in four hours, even with having to recut one of the front pieces.


His is also in rayon, with coconut shell buttons.  I washed his shirt while we were on vacation, though, and sadly, the collar is now fraying at one of the points.  I actually tried not to trim that point too closely, and now I'm not sure what to do.  Probably Fray-Check and some zigzagging.


Gripes about the sizing aside, I enjoyed sewing these shirts.  The pieces come together well and the instructions are quite good.  I do think there is an error in the way the collar is sewn.  The instructions instruct you to clip the shirt neckline, and not the collar stand.  If you do this, though, the neckline becomes much too wide for the collar stand.  I actually needed to clip the collar stand where it attaches to the neckline, in order to make it fit, so that's how I sewed these shirts.

I will definitely be sewing more of these in the future, just making sure to size up.  For now, though, I'm glad that my shirt-making marathon has ended!

Tuesday, August 8, 2017

Bonn Fever

I've been sewing a ton the last couple of weeks in preparation for our upcoming annual beach vacation.  I've made four men's short-sleeve button-down shirts,  two girls' dresses andthree swim suits with another in progress.  But I haven't had time to get any decent pictures.  I'm hoping to remedy that with the ocean and the sand dunes as my backdrop. For now, I leave you with an overdue post about my latest Bonn Shirt (affiliate link), sewn back in May.


So it's official, I have Bonn fever.  I haven't had any good button-down shirts in my wardrobe since I got pregnant with Niko and outgrew the Lisette Travelers I made in 2014.  I'm rapidly filling those holes, and now I present Bonn #3!

I should note here that I tried to photograph this shirt a number of times during an overcast spring.  I still haven't found a good spot for photos in or around the new house, so here's a bunch of blurry images featuring a wrinkled shirt that I refuse to iron it single time I try to photograph it.  And also I wore it a lot before it got too hot.


I made this one in the long-sleeved view.  I think I will probably make them all long-sleeved from now on.  I like a full-length sleeve in chilly weather, and when it's not so cold, I just roll them up, so this will make them more versatile.  The sleeves did end up a bit short so I will need to lengthen it about 1.5" on my pattern piece.

Again I sewed a 10DD graded to a 12 at the waist and a 14 at the hip.  It fits well, though I think if I ever make this as a dress or a tunic (which I am planning to do), I should probably grade out to the 16 hip if not the 18, as I think the 14 will be too tight if I continue it all the way down.


Like on my second Bonn, my bust darts are an inch lower and an inch shorter, the shirt is lengthened 1.5" and there is a 5/8" forward shoulder adjustment.  This time I also deepened the V in front by 1".  I forgot to do this on the pattern, so it was an afterthought alteration after my pattern pieces had already been cut.  I need to redraft my pattern to include this change.  I am forever lowering necklines as I usually find a lower neckline to be more flattering on my large bust - it seems to have a minimizing effect.


The sleeves are pleated to fit them into the cuff.  I didn't read the instructions carefully enough, and I stitched my pleats closed rather than basting them.  It doesn't really matter, though, given my predilection for rolled up sleeves.

I am scratching my head a little on the forward shoulder adjustment.  I've read a number of different tutorials on the forward shoulder, and I see two different methods - the first calls for shortening the front shoulder all the way across, and adding back to the entirety of the back shoulder.  The second method, which is the one I use, calls for subtracting from the front outer shoulder edge only, leaving the neck edge as is, and drawing a diagonal line between the two.  I use this method because it makes sense to me that only my outer shoulders are forward - the part attached to my neck can't really migrate forward because it is attached to my neck.  But maybe I need to do it the other way, because the adjustment I made hasn't totally worked on this shirt - it still migrates backwards.


I didn't mention hemming in my other two Bonn posts, but I had quite a difficult time making the small hem on the curved shirttail.  I ended up with a flippy hem on the linen one even after I redid it.  This time I used a triple-stitch method that now I can't locate to link for you, and it was better, although I still find that the hem flips up after I wash it.  It's really annoying, but I have had RTW shirts do that too.  Does anyone have any tips there?

As it's summer now, I haven't worn the shirt much lately.  But I'll be pulling it back out for heavy rotation later this fall, and I even have this fabric stashed away in the black/gray/white color (100% cotton shirting, from Walmart of all places!) to make another one.  It's definitely a winner.

Thanks for reading, and see you next time!