A sewing blog about building a functional, cohesive handmade wardrobe, one garment at a time.

Monday, March 3, 2014

Renfrew, take two


Despite all my grumbling about having to re-fit the Renfrew, I cut a second one immediately after finishing the first.  I used an unrelentingly drapey knit purchased long ago when Joann's was having a 50% off Red Tag fabrics (on another note - that Red Tag section is so deceiving - I have never actually found the bargain basement pricing as I would expect there).  I think it is this knit from their web site.  I had some buyers' remorse after I bought it - I had purchased three yards thinking I'd make a wrap dress, but then decided I wouldn't wear such a spangly dress.  As it turns out, though, it's kind of a perfect fabric for a cowl-necked top.  And it's not as spangly, made up into a garment, as it appeared as a cut of yardage.


I decided that the stretchiness of the knit would require me to cut a smaller size.  After much hemming and hawing (and really no mathematical or scientific reasoning), I settled on an 8 through the shoulders stretching to a 12 in the bust and a 10 in the waist on down.  I also added an inch of length to the main body and cut the neckline 1/2" lower.  Again I sewed the sides with a 3/8" seam.   The 8 shoulder works well but I should have kept the 14 in the bust.  Finally, I did a forward-shoulder adjustment.  I have noticed particularly on my recent woven tops that I have to keep shrugging them forward. After some Googling I found that there is a relatively common and simple fix for this.  It's less necessary for me in knit tops, but I still think it made this top fit better than the last one.  I'll blog about it in more detail the next time I make a woven top.


It's funny how I never notice drag lines in my RTW garments, but they are all I see when I scrutinize my sewing.  I totally would have bought this top for $19.99 at Marshalls.


The above pic is a little washed out due to flash, but you can kind of see the spangle in the fabric.  From far away it just reads gray, though.


I think the cowl looks better on this one than on my last one, but that probably has mostly to do with the drapiness of the fabric - it's like a Slinky in that it just pours over itself.  I'll keep the lower neckline for my next Renfrew, though.  Maybe even lower it a tad bit more.

Friday, February 28, 2014

Mixed-print Sewaholic Renfrew

So, not only am I late to the Renfrew party, but it appears I actually had no idea what kind of party it was.  All the Renfrews I had seen on Flickr looked awesome and effortless, but I hadn't done much more research beyond that when I ordered the pattern a few months back.  After it arrived, I did a little Googling and learned that Sewaholic patterns designed for the pear-shaped (which I am not - at least, not as pear-shaped as the woman for which this pattern was designed).  I also found many, many bloggers who had to do multiple test-runs before getting the top to fit them properly.  I wasn't expecting this (because I am dumb) so the pattern sat around for awhile.

Renfrew, looking unspoilt for a brief few minutes before my kids wake up and
embellish it with their snot tears fingerprints love.


This week I finally cut into my Renfrew pattern.  The size chart would have me cut between a 14 and a 16 if I were going by bust size, but all my selfish sewing the last few months has taught me NOT to do that.  I am always happier with the fit through the shoulders if I use my high bust and then adjust the pattern pieces to make room for the girls below the armscye.

So, after reading a million and one blog posts about it, I decided to cut a 10 in the shoulders, widening to a 14 at the bottom of the armscye (to make extra room for the bust), then grading to a 12 at the waist.  (My measurements are 39.5-31.5-41.5).  My hip measurement coincides with the Sewaholic size 10, however, the finished measurement of the hem is less than the hip measurement for the same size.  I believe this is because the pattern is drafted to hit higher than the hip, but I felt like I could use a little extra room.  So I kept the size 12 all the way down.


The pattern calls for "stable knits."  I wasn't sure what that meant.  But I did have 1.5 yards of a French terry I had bought on a whim from fabric.com awhile back, and I thought it would make a cute cowl-necked top.  1.5 yards wasn't quite enough for view C, though, so I dug through the stash and found a striped mystery knit for one of the cowl pieces. Originally I had planned to hide it on the underside of the cowl, but on an impulse I decided to have it be the part of the cowl that shows.  The plaid print would have been a little much on the cowl too, I think.


(I should mention that I did not realize there was an errata until I'd already serged the two cowl wrong-sides together as instructed in the printed pattern.  I didn't feel like unpicking the overlock so I left it.  But actually, you can't really see the serged edge when I wear the top anyway.)


I ended up sewing the sides up with a 3/8" seam allowance instead of the prescribed 5/8" allowance; and I'm glad I did.  This French terry has almost no stretch so I needed a little more wiggle room.

Once I got the pattern traced, this sewed up FAST.  I was finished in the time it took my girls to watch two episodes of Sofia the First (on Youtube, no commercials in between).

Pattern matching?  Ha.  My official excuse is that I was working with limited fabric.

After some overnight consideration, I have concluded that I like the top.  It is comfy to wear and I like the pattern mix.  I think it could use just a hair more length.  I also think that a wider and lower neckline (and slightly longer/drapier cowl) would be a little more flattering on me. I want to try again, but my next attempt will be with a stretchier knit, so I know I will have to start from scratch on the sizing (and I really don't want to ... maybe I'll just make another Plantain and add a cowl to that!).


I should note that my husband, he of the silver tongue, proclaimed it "cute." Hopefully that means it will get more wear than my last Washi dress, which I put on the other day only to take off and change into something that looked less Amish.

Sunday, February 23, 2014

Plantain #4 and this business of taking good photos

I have always loved stripes.  My wardrobe always contains at least one striped tee.  But now that I have discovered the liberating world of successfully sewing my own knit tops, I think I am headed for stripe overload.  This is my second striped Plantain, and I have two more cuts of striped cotton/lycra jersey in adult tee quantity.  I need to buy more solids.

I wore my new tshirt to church on Sunday so that we could take some photos on the way home.  This city definitely offers some interesting backdrops.


My husband is getting better with his photo composition, but today I realized that I need to tell him to look critically at the clothes and tell me, for example, that my skirt is lopsided (that seam is parallel to the hem, I swear).  Or that I'm pulling one side of my striped shirt down with my hand so the stripes look wonky when I assure you they are not.


I actually made the skirt two years ago out of old jeans.  But now that I am thinner I need to take in the waistband a bit so it doesn't go lopsided when I wear it.


I also didn't realize that I was wearing my hair draped over my shoulders in every picture until I got home and saw that there was not one good photo of the neckline.  So I had to resort to bathroom pictures after putting the baby to bed.  Man, I look tired.  It was a long weekend.


So we have a little to work on, when it comes to photos.

But back to the pattern.  I guess this is now officially a TNT pattern for me.  My final fit adjustment was as follows: I cut a straight 40 for the back.  For the front, I cut a 40 in the shoulders, and graded out to a 42 at the bottom of the armscye, then continued as a 42 all the way down, but with 40 length.  I cut a 40 neckband and a 42 sleeve.  I am very happy with the fit, so I'm done tweaking.  Yay!


I used a cotton/lycra from Girl Charlee.  It is very comfy and silky, but the fabric did pill a bit after I prewashed it (six times).  For the neckband I used a purple rayon-lycra from Joann's.  It doesn't quite match - but I wanted a solid neckband and it did not occur to me until afterwards that I could have done so with my striped fabric if I had done a little math and centered the purple stripe under the pattern piece.  I really love the color combination, and I will definitely wear this a lot, but after looking at it some more I think maybe thinner stripes are more flattering on me.

Not much else to say about this one.  Love it!

Thursday, February 20, 2014

TUTORIAL: Leggings to Jeggings, Part 2


Hi!  Welcome back!  We're very excited to show you how to sew up these super-awesome jeggings. (Part 1 of this tutorial, wherein we made our pattern pieces, is here.

TUTORIAL: Leggings to jeggings, Part 1


My four-year-old recently began to profess a preference for tight pants.  As in, she refuses to wear pants that aren't tight (and soft).  Skin-tight.  She likes leggings and jeggings.  And that is about it.

Monday, February 17, 2014

Not-so-baby pajamas

My baby turns 1 tomorrow (sob), but he outgrew his 12-month clothes, like, five months ago.  He is a big boy.  We are down to two pairs of cotton pajamas that fit, and the frequency of laundry around here is not such that this always works for us.  I've been wanting to try out some of the patterns in my Growing Up Sew Liberated book for awhile - and it's a good thing I started now because they only go up to 5T.


I wasn't a huge fan of this orange Jay McCarroll knit when I first saw it on sale.  For one, the fabric line is called "Germania" and is not, as I had originally thought, an homage to Germany.  It's inspired by germs, folks.  I bought it anyway because it was only $4.50 a yard and I didn't have many (any) boyish knits in my stash.


I only had a yard of it, and after I aggressively washed and dried it six times, that yard became less than 30 inches. (Yes, six times through the washer and dryer. I hate when knits shrink after they are already sewn up, so I often will put them through the wringer before even cutting into them.) I managed to squeeze a 18-24 month envelope tee and 2T sleeping johns out of the yard and I even have a little leftover for appliques later on.  For the trim, I went against good judgment and used some cotton interlock.  Even though the fabrics don't match, or even really coordinate, I really love how they look together.  But of course, the interlock doesn't have as much recovery as you need for a good neck binding.  I figure it's just pajamas, it will be fine.


The pieces sewed up really quickly.  The sleeping johns pattern has just one pattern piece, of which you cut two mirror images.  I added the leg cuffs because I wanted to have some of the trim on the pants too.  They are nice and roomy for a cloth diaper.

I tucked a folded over scrap of knit in the back waistband so that my husband would know which way they go on.  I didn't use ribbon because I wanted it to be really soft.


In this photo you can see that there are tiny bright teal dots sprinkled here and there throughout the print.  I think they would really pop if I had a bright teal knit to use for the trims.


The envelope tee was easy to sew up, too.  I really like the way she has you finish the binding - you zigzag around the seam join for the binding and the main fabric, catching the raw edge in the zigs at the back.  Like a mock coverstitch.  Unfortunately, my machine won't do a regular zigzag on knits anymore - I don't know what the problem is.  I used a 3-step zigzag but it skipped a lot, so the finish isn't that pretty.


I kind of love these pjs.  They are so soft.  I want a pair for me.  I hope that all my pre-shrinking means they won't shrink much more, so that they will last through the fall.  The pants are definitely long enough; he might outgrow the top, though.  Maybe I should order some more of the fabric ...

Sunday, February 16, 2014

Little ballerinas

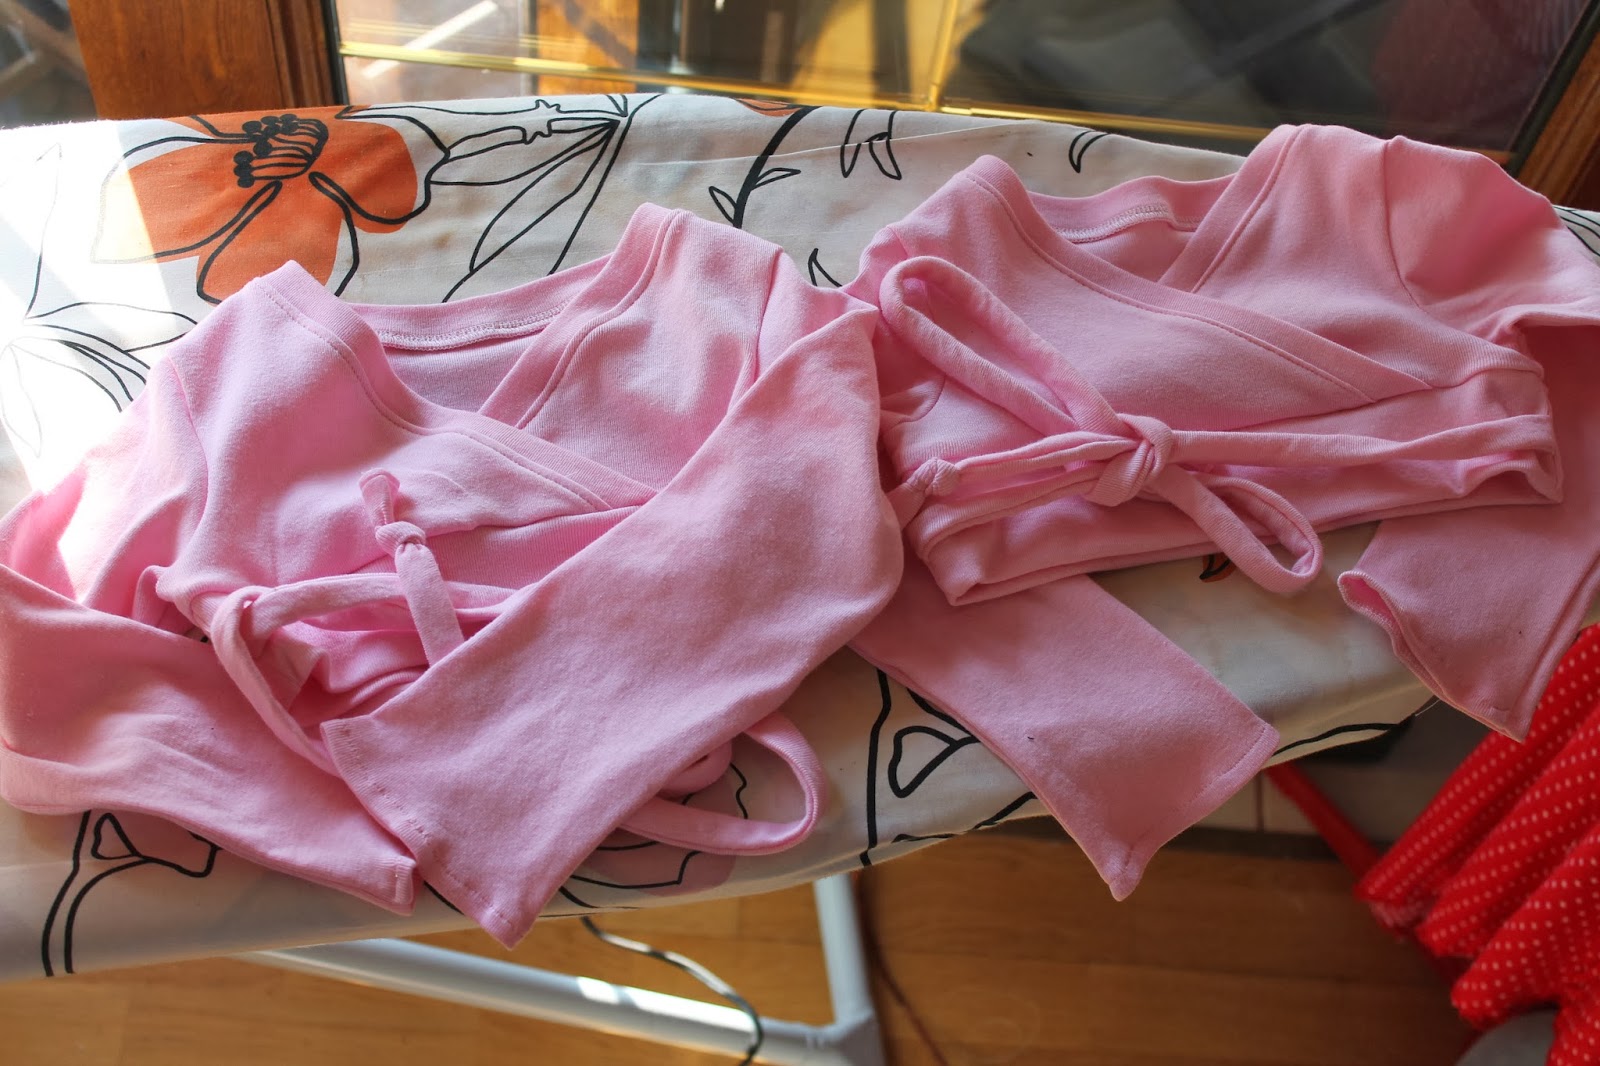
I came across the Heidi and Finn Ballet Sweater pattern well over a year ago, and pinned it immediately.  It is the type of item that, to me, it makes sense to sew, as it's not something I could easily find in toddler and preschool sizes, and dance items like that tend to have an insane mark-up in my experience.  This weekend I finally bought the pattern and sewed up two for my little ballerinas.


I had two yards of a soft pink rib knit in my stash, picked up from the $2.97/yard mystery pile in the back of G Street Fabrics' Falls Church, Va., location.  Normally I would choose a cotton/lycra knit for something like this, but I already had this in the stash, in the right color, so ...

Excuse the dirty tights please!
I opened the pattern, read through the first couple pages of instructions (including the admonishment to measure your child before choosing a size), and then flipped around to find the size chart.  Except there is no size chart, not in the pattern, nor online.  I wrote to the email address in the pattern, and sent a message through Etsy, but didn't hear back and I wanted to sew them rightaway.  That was a bit annoying, but I found a post on the Heidi and Finn blog that said they are working to get size charts in all their patterns - hopefully they will do that soon.  In the meantime it would be nice if they had one online somewhere at least.

Anyway, without a chart, I guessed on the 3T for both girls. It worked, but I definitely need to lengthen it.  I think I might do a sleeve cuff next time too, to bring it in a little more, since I get wavy hems even using my walking foot (I feel like maybe it doesn't work right).


The sweater is a very easy sew, especially if you have a serger.  I did most of the work on mine, only heading over to the sewing machine for a couple instances of basting and top stitching.


I made a couple of alterations.  I noticed that the pattern calls for neck binding that is the same length as the neckline.  In my experience, this makes for a floppy neck.  I might have risked it if I were using a cotton/lycra blend, but since my knit's recovery isn't so good, I decided to cut the binding shorter.  I measured my neckline (it was 24" for the 3T), and cut my binding to 20."  I also cut the bottom band two inches shorter than the bottom of the main shrug, for the same reason.  It worked well.


I think I will get a lot of use out of this pattern - I bought the extended size-range one, that goes up to 12 years.


(Little sister is sick and wasn't feeling up to modeling for me.)