A sewing blog about building a functional, cohesive handmade wardrobe, one garment at a time.

Tuesday, April 21, 2015

KCW Day 1 - Sentimental Knit Dress

After my mom's funeral last year, my sisters and I cleaned out her closet.  We donated a bunch, kept a couple pieces that we wanted to wear, and I squirreled away a few things that I thought I might repurpose into clothing for her granddaughters.

Among the latter items were my mom's infamous fish dresses.  Over the course of the last 10 or so years of her life, I think she bought at least five of these dresses.  When we cleaned out the closet there were three remaining.  They all had different labels and were bought at different stores at different times, but other than color, were pretty much exactly the same.  All are made of non-stretchy knit t-shirt material, are printed with a rather unattractive ocean themed pattern, and are shaped like tents.  These dresses were a running joke among my sisters - we couldn't understand why mom gravitated towards them.  But they were part of her summer uniform (although sadly I have been unable to find any photos of her actually wearing one).


I have a great memory associated with the blue dress in particular, though.  We spent a few months in the States in 2012 between our overseas postings.  During that time, dress-obsessed big sister would not tolerate her "Baka" (how she pronounced "Babushka") coming downstairs in anything other than a dress.  If Baka were to descend in pants and a shirt, big sister would take her by the hand, lead her upstairs to the closet and pick out a dress.  The light blue fish print was her favorite one.

When I took away these dresses, I had in mind summer beach clothes for Baka's three granddaughters.   Yesterday I pulled the dresses out and spent some time thinking about how to do it. I decided to use the Comfy Knit Dress tutorial from lbg studio, pinned ages ago but never attempted.

After much hemming and hawing I decided to use a number of different fabrics from the stash.  I was going for a cute boho effect but I'm not really sure how much I like the end result.  I don't think the fish fabric really goes with the other prints.


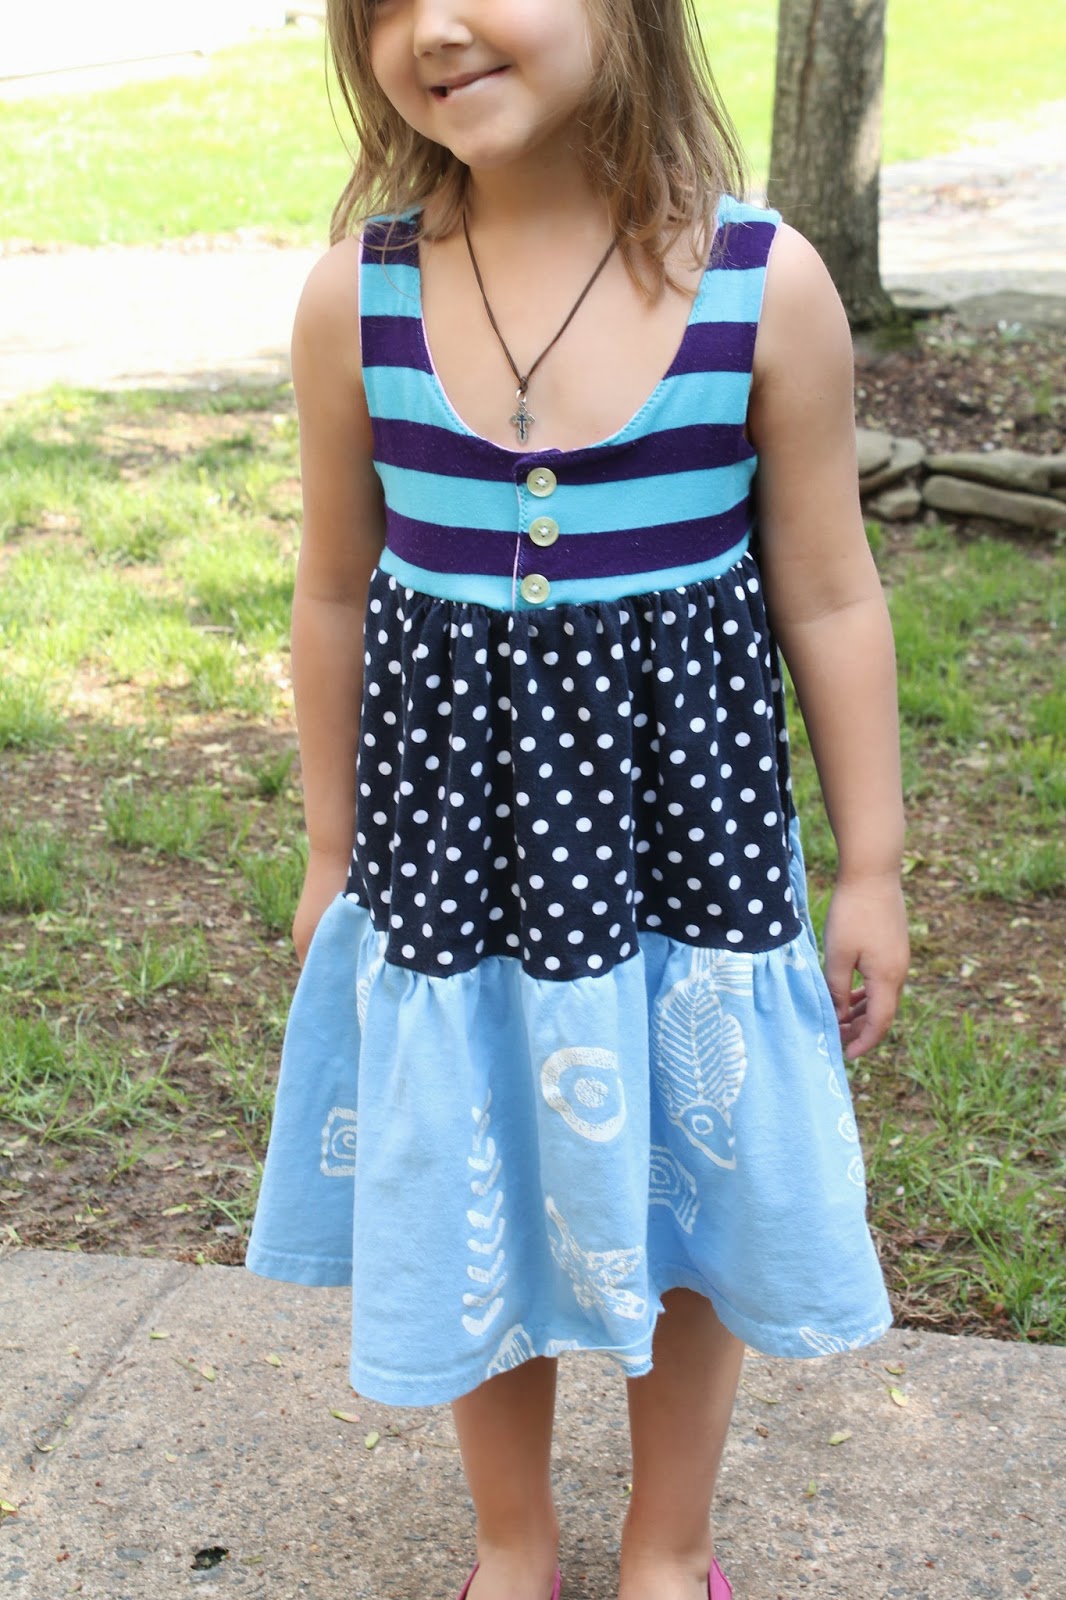
 I extended the pattern to a 4/5 size per the tutorial but I neglected to reinforce my shoulder seams and as a result the weight of the skirt pulls the bodice down.  It's almost indecent, as you can see, so I need to go back in and shorten the shoulder straps (and reinforce that seam).


Though I had planned the blue fabric for big sister's dress, the bodice ended up too large for her.  Little sister was happy to take the dress, though, and although I'm still not quite sure how I like it, it will work for play this summer.


I'm still planning to sew two more of these dresses using more of the fish fabric.  On the cutting table right now is a version using denim jegging fabric for the bodice and the green fish for the skirt.  Not certain how to use the black, if at all, for a little girl's dress. I have enough of the blue for the third dress so I might just turn the black into a beachy skirt for myself.  It's funny how the ugliness of the fabric doesn't seem to matter anymore ... suddenly the butt of years of jokes takes on enough sentimental value that I'm willing to wear it.  Funny how that happens.

Wednesday, April 8, 2015

Mod shift dress for spring

I last left you with images of little sister's new dress for spring.

When it was older sister's turn to choose fabrics, she picked out a rose-print woven cotton pique, purchased for $4/yd during a FabricMart sale last year. I was curious about the fabric's lineage, and thanks to the magic of Google, discovered that it was from a Land's End dress line a couple seasons back.


It's funny, if I had seen this dress at Land's End, I would have thought "meh," and scrolled past it.  I don't think the lines of the dress make the best use of the fabric.  But when I saw the fabric swatch at FabricMart, I couldn't stop thinking about it until I had purchased it.

During my Google investigation, I also found a few projects using the same fabric, including this incredible ball gown.  I think it is stunningly beautiful, so click over and have a look!

It took me a few days to figure out what pattern to use.  Big sister is so skinny and the print was so big that I didn't want it to overwhelm her.  Ultimately I decided on a simple silhouette.


I got Simplicity 4927 at a thrift store for 50 cents.  View A, with sleeves, looks very Becky Homecky to me.  But View B, a sleeveless a-line shift, is a classic design that reminded me of the dresses my Babushka made for me when I was a girl.  


The dress is simple enough - three pattern pieces if you don't count the facings.  And I didn't.  I wanted the dress to be cool and summery and facings felt a little fussy for that.  I decided to try an invisible bias finish on the neck and arms instead.


As you can see, I did not achieve a perfect finish.  Though the neckline does pucker slightly against the stitching, it now lays flat against the body when worn.  Not so with my first attempt, which was poke-out city.  I had to take it out and redo it, helped in large part by this great post from Grainline Studio.  I had neglected to clip the neckline sufficiently the first time around, but another go-round with the scissors fixed the problem.


After it was all sewn up I decided that it needed something.  I searched the stash and found some trim that I had picked up at the grocery store (yes) when we lived in Georgia.  I think it suits the lines of the dress and the fabric perfectly, and it further reminds me of things my grandmother used to sew.


A big yellow button from the stash to complete the mod feel, and I was done.


I searched for a photo of myself wearing the dress that I was thinking of when I sewed this, but I couldn't find one.  However, I do still have the doll dress that my Babushka made to match.  When I pulled it out (after the dress was all sewn up) I couldn't believe it - it was exactly the same dress with exactly the same construction.  Granted, this construction was not at all difficult.  I did have to modify the back opening after I opted out of the facings, and it makes me smile to know that I did it the same way Babushka did when she made this little doll dress.


A-line shape - check.  Cool structured fabric (in this case cotton faille) - check.


Invisible bias neckline - check. Seamed back with simple button closure - check.


However, Babushka's bias-finished neckline and armholes didn't pucker at all.  And she finished them by hand.  I could have learned a lot from her.


She would have loved the dress.

Tuesday, April 7, 2015

A Seashore for spring

During a recent closet inventory, I noted that each girl could use an everyday summer dress. They each have a few church dresses, but those are reserved for Sundays as I am a believer that church clothes should be kept nice. So it was time to do a little sewing.

I set out an array of fabrics from my stash and let them choose. Little sister chose this Valori Wells linen that I got on super-sale from Jimmy Beans Wool three or four years ago. I only had a yard of it, and I had been itching to sew another Oliver+S Seashore Sundress. 


Don't mind the dirty tights.  That's how we roll around here.

I sewed up the 3T with added length for my 4.5-year old (who fits RTW size 5 perfectly). The fabric motif runs parallel to the selvage, which makes it a natural partner for the Seashore's many vertical seams.

My official excuse for not even trying to pattern match is that I was working with limited fabric. Also it was about midnight when I got started (hello, third trimester insomnia!) So I shouldn't have been surprised when I made some dumb cutting errors and the dress was too short. I didn't have enough fabric to cut new pieces, so I decided to sew a band around the bottom.


As I didn't have enough fabric to cut a single piece, and because pattern matching the rest of the dress would have been a nightmare, I decided to cut the fabric on on the cross-grain and piece it together to make the band. I messed up there, too (I think it was about 1 a.m. at this point), and didn't get the band's seams lined up with the dress's seams. Honestly at that point I didn't even care.  I had messed up so many things, I just wanted to be done. So I powered through, added some thrifted vintage-looking buttons, and gave it to her the next morning.


I took the dress out of the wash today and while the dress itself is not terribly wrinkled
(at least not by my standards, go ahead and judge), the facing did not seem to want to stay inside the dress.  Ironing the dress after every wash will get old fast so I think I might tack the facing at the side seams. Or maybe I'll even topstitch it down completely to make sure it stays put.


In any case, I got to sew the pattern again, I used up a 1-yard cut from my stash, and I filled a wardrobe hole.  Wins all around.


Happy Spring!

I made big sister's dress in the photo above, too.  That will be in my next blog post.

Tuesday, March 31, 2015

Teeny tiny baby diapers

I have always wanted to try sewing a newborn diaper stash, but it always felt very daunting.  When the girls were still in diapers, I made a pocket and a few fitteds using an ill-fitting self-drafted pattern.   The failure was enough to put me off the project for a few years.  While pregnant with little man, I bought the Darling Diapers Unlimited pattern and made a few fitteds, which worked much better.  So this time around, I used my nesting energy to sew a new stash.  (Although we have cloth-diapered all our kids since birth, I was certain #3 was our last so I gave everything away as he outgrew it.)

So here we are having to start from scratch.  Luckily, I now have a very good idea of what I want in a nb diaper stash:

* About a dozen prefolds, since they wash so easily and can go into the dryer and double as burp cloths.
* About a dozen fitted diapers, because fitteds+covers contain newborn poop the best.
* A few rise-adjustable double-gusset PUL covers (I like Thirsties Duo Wraps),
* A handful of pocket diapers for nights (these are also a Papa favorite).


I purchased the newborn prefolds you see in the left side of the drawer (Green Mountain Diapers, love them) because it's not really economical to make them yourself.  Everything else was made by me.


I kicked off my stash sewing by making a dozen fitteds using the Darling Diapers Unlimited pattern.  The pattern contains many variations - including sizes from tiny newborn and regular newborn up to toddler and options for pockets, fitteds, all-in-ones and covers.  There are options for front snapping, side-snapping and hook-and-loop closure.  If you like the fit it is the only diaper pattern you'll ever have to buy.


As my last two babies have been 8 and almost 9 pounds, I went for the regular newborn size.  It seems a little large to me but the couple I made for G fit him for a good long time, so I don't really mind if they are a little big to start. The fitteds themselves are each constructed of three layers of fabric - mostly bamboo fleece and organic bamboo velour, but a few have cotton print knit outers and one has a woven outer.  A few have hidden layers of hemp fleece.


There is an option for an umbilical cord snap-down but I only used it on the striped one.  All my kids have lost their cord stumps within a few days of birth so I figure that won't be a big deal.  The eagle-eyed might notice that my snap placement isn't the same on all the snap diapers.  This is because I have this issue with trusting diaper patterns' snap placement.  I have no idea why, but I always seem to think I can do it better on my own (and I never do).  At some point I should learn.


Each fitted has a lay-in soaker made of three layers of fabric - a combination of bamboo fleece, organic bamboo velour and hemp fleece.


I was pretty careful with my seam allowances, but even so it seems to me that the contour soakers I made are not going to fit well inside the leg elastic. We'll see, I guess, but it's a good thing I made some super-awesome double-gusseted PUL covers to contain the messes :)


I was planning to use the DDU pattern to make the covers, but the fitteds looked so big to me, I wasn't sure the newborn size DDU cover would actually fit over them.  And then I discovered this free pattern  for an adjustable newborn/small PUL cover, so I used it to make my covers.


After I'd made three, I decided they should be a bit longer, so I lengthened the pattern by 1.5" and added another set of snap sockets to make the green cover adjustable to three sizes instead of two.  I made the leg gussets using this tutorial.


I'm very pleased with the end result - they look just like the Thirsties Duo covers I used and loved for the other three kids.  They take about an hour to sew, start-to-finish, and they are so much cheaper to make than to buy (I think mine were about $3 each for materials, whereas the Duo covers run about $13 a pop).  All of this adds up to make them a very satisfying sew.

Next up was a half-dozen pocket diapers. We like using them at night for babies who don't wake as often (fingers crossed that #4 falls into that category) since they keep the skin drier than fitteds.


I tried going back to the Darling Diapers pattern for my pockets, but after I made one (the blue one with velcro closure), it looked really small and hard to stuff.  I used the regular newborn size with the rolling elastic option.  My fleece keeps rolling to the outside of the leg openings so I also worry it will wick.  Rather than fuss with the pattern I made the remaining five pockets nb/small sized using another free pattern from the prefold2fitted website.

I liked that they were size-adjustable and will fit longer.  Each pocket is made of one layer of PUL and one of microfleece.


You can see the size difference in the above photo.  The DDU one is nice and trim but it won't fit as long as the other one.

I opted not to fuss with a pocket opening that was cut or sewn into the micro fleece.  Instead I just folded down the microfleece in back to be like some bought pockets we have used and loved, and I added a little elastic on the micro fleece portion of the pocket opening as well as on the PUL side.


For inserts I used this free pattern from the same site.  I did double-petal soakers with each petal constructed of one layer of hemp fleece and one layer of microfiber.  I have some bought inserts made of that combination of fabric and I love them.  They are trim but very absorbent.


I had such fun sewing this stash (over a period of about three months) that I had to have a stern talk with myself once I had fulfilled our diapering needs.  It would have been very easy to go overboard and make a million more diapers!  What I made will be plenty.


I'm very happy with how everything turned out ... I hope they fit well!


Tuesday, March 24, 2015

Euro leggings

I am generally a frugal person.  Fabric shopping has been no exception.  I search out deals, buy things on sale, etc.  This has worked very well for me in general, except when it comes to knits.  With very few exceptions, I have found that you get what you pay for when it comes to knit fabric.  Big sister in particular loves to wear leggings, so when I make her a pair they get a LOT of use and I find out pretty quickly which knits hold up and which don't.  I have made a number of purchases from the usual knit suspects, and despite the popularity of some of these outlets I am sad to say I haven't had a ton of luck with the $6-$7/yard range of knits, at least not when it comes to leggings.  There has been a lot of pilling, awful fading of prints and holes developing quicker than it seems they ought to be.

I had been shy to try out the vaunted European knits because of their price tag.  But at Christmas I was treated to some fabric shopping and I used the money to pick up a few yards of Lillestoff and Stenzo cotton/lycra.  Though my girls are small enough that I can still get two pairs of leggings out of each yard of fabric, and though I have sewn no fewer than eleven pairs of Playtime Leggings without any trouble whatsoever, I was still terrified to cut into that fabric.  Because if I mess it up, that's $20 down the drain.  Told ya, I'm frugal.

But then I made yet another pair of leggings out of fabric that didn't look so good after a couple washes, and enough was finally enough.  So this week I screwed up my courage and cut into the Euro knits.


I knew my rose-obsessed girl would love this print from Stenzo.  I was a little nervous to use a print for leggings - the last time I used print knits for leggings, the pants looked a hot mess within a couple of weeks as the dye faded and held onto dirt like crazy. 


I made these in a size 3 with added length - the main legging piece was a 4 + 1" and then I added a 3" cuff at the bottom.  I chose to finish with a cuff because I have been having a lot of trouble topstitching knits on my machines lately.  I've tried ballpoint needle, stretch needle, double ball point, double stretch, zigzag, walking foot, stay tape, Wooly Nylon, etc., in short, all the usual suspects, with no luck.  My machine does condescend to stretch stitch (lightning stitch) on knits, however, I don't like how that looks on hems.  


The leggings fit well but she had a little trouble getting them on.  At first I thought that the 3 was too small but upon reflection I think it's that I needed to adjust the width at the bottom of the leg as I lengthened it, since the hem of the size 4 length actually hits at her calf, I should have adjusted that point on the pattern to be a little wider. Instead I just kept it the same width from there on down.  (I don't think I explained that too well, sorry).

In any case, I decided to go up to a size 4 for the next pair.  These have a more relaxed fit but they still fit her preference of "tight pants only."  I am not sure whether the 3 or the 4 is a better fit for her.  I almost feel like I should grade between the sizes for the next pair.  

This knit is a yarn-dyed Lillestoff stripe.  It is soft but substantial and I enjoyed sewing it.
For the waistband, I decided to try the RTW method of attaching the elastic to the top of the pant, then folding it over and topstitching through two layers of fabric and one layer of elastic.  I used a zigzag to topstitch and only had four or five skipped stitches the whole way around (this is a big victory since usually my machine won't zig or zag on knits).  Time will tell whether this method is any better than the casing method, but I did enjoy not having to sew a casing.  For some reason I really dislike sewing elastic casings on knits.


She loves both pairs of leggings and I still have some more Euro knits in my stash to try out - a Stenzo polka-dot print and a Lillestoff squirrel print I bought for baby things.  Perhaps a fabric-shopping conversion is about to take place!

Wednesday, March 18, 2015

Another reason I haven't been blogging ...

So ... there's a baby coming.  That's another reason I haven't been blogging - I was really, really sick for what seemed like forever (but was really just the first trimester).  Sewing made me want to puke.  Typing made me want to puke.  Puking made me want to puke.  Pretty much everything except, oddly, spinach salads for breakfast, made me want to puke.  Thankfully, I don't feel that way anymore.  Though, if we are being honest, I have been consuming far more Oreos than spinach lately.


After Christmas, I finally started sewing little baby things.  We opted not to find out the gender. We've had two surprise-at-birth girls and one found-out-in-advance boy, and we have found that we prefer not knowing.  This does, however, make sewing baby clothes problematic.  I have seen some wonderful examples of truly gender-neutral baby clothing (here and here, for example), but I was limited in my fabric choice as I had determined to sew all my baby clothes from stash.  And gender-neutral clothes often seem more boyish to me. It's horribly unstylish of me, but I know from experience that once the baby is born and I know who he/she is, I want the girls to look girly and the boys to look boyish.  It's just how I am.   (And as we I was positive the little man was our last baby, I gave away all our baby things - so we are really starting from scratch).  In the end I am pretty pleased with how these particular items turned out, but I guess the proof will be in the pudding if we have a girl ... will I want to dress her in them?


I sewed this bodysuit and pants of a double-faced gauze I bought on super-duper sale at FabricMart last year.  I used a different color way to make my second Late Lunch Tunic and it didn't hold up that well.  I think that was because that tunic somehow ended up a tad too small around the rib cage though it could be due to the fragility of the fabric.  Just in case it was the latter, for these items I sewed 1/2" seams on my sewing machine and then used the serger to sew a 3/8" seam for reinforcement.


I had quite a bit of difficulty getting the fabric in general, and the bias strip in particular, to behave.  I think in this fabric I should have cut a wider strip.  I ended up giving up and there are bits where the strip didn't get totally turned under.  I zigzagged those to prevent fraying but the inside neckline does not look so pretty.

Both items are size 0-3 months, but I lengthened the bodysuit to the 3-6 month length to ensure room for cloth diapers.  The fabric is so lovely and light and soft - it is perfect for baby summer wear.  Just don't look too closely at the topstitching.


To distract from the messy inside neckline, and also because I think it's funny, I used one of these strange twill-tape labels I got free with purchase from Land of Oh a couple years ago.  About half the labels say "Handmade," which of course makes sense and is useful.  But the other half say "Sunbonnet."  Underneath that it says something about handmade things being made by people with their hands.  Cracks me up.


I made a second set of pants out of this lovely striped linen I picked out of the remnant bin at Joann's a few years ago.  The pockets and waistband are also remnant-bin linen.  The top is fabric reclaimed from my only-worn-once July 4 Washi dress of frumptastic frumpiness.  I used the same striped linen for the neckline binding, and yellow KAM snaps.  The size 16 KAMs really are too big for the pattern (and they are a little tough to unsnap) but again, I was working from stash and I didn't have the right kind of snaps.


The pattern, as I had expected, is a well-drafted with clean details and thorough instructions.  The only view I didn't make was the jacket.  I'd like to make one in knit - though this will be a late spring/summer baby a cardi will come in handy for air conditioned spots - but I'm having a lot of trouble with knits on my machine these days so it will have to wait until I'm really motivated.