A sewing blog about building a functional, cohesive handmade wardrobe, one garment at a time.

Friday, April 28, 2017

All the solids

I'm so excited for Me-Made-May! Last year was my first time participating, but I really had so little that fit me, and I was over-ambitious and tried to wear too much me-made for what was in my closet. I crashed and burned after about day 9 because it just wasn't fun to try to mush together outfits out of my decidedly non-coordinating closet.  It did rev me up to start sewing for myself, and since last May, I have selfishly sewn nearly 50 articles of clothing.


By the numbers, I have made:

3 pairs of pants (including two pairs of jeans)
7 skirts
3 dresses
5 cardigans
5 long-sleeved knit tops
1 woven long-sleeved shirt
5 short-sleeved knit tees
5 short-sleeved woven tees
2 tank tops
4 pairs of shorts
6 pairs of underwear

And though I've actually gained a solid 10 pounds in the last six months (I wish I was one of those people who stopped eating when stressed out),  I actually feel better getting dressed in the morning than I did a year ago.  And that is 100 percent due to the fact that I now have a closet full of clothes that (mostly still) fit.


The coordination aspect is a new development for me.  I was sewing so furiously last summer that I had amassed a good number of pieces before I realized that I still didn't have a lot of outfits that really looked put-together.  Part of the problem was that I felt compelled to sew from my ever-growing stash, which was print-heavy. I much prefer to wear solids and stripes, but guilt forced me to sew my prints up into a bunch of tops that really didn't look great with much of anything.

I mentioned a couple of posts ago that I had made a spring sewing plan designed to address this issue.  Pictured in this post are two of the t-shirts I had planned to make, and a bonus pencil skirt that landed on the list when I found this fabulous double-knit fabric on the $2.97 table at G Street Fabrics last weekend.  

It's a good thing that store is 40 minutes away, that's all I'm saying.


The fabric had a scrap of paper on it identifying it as Ralph Lauren double-knit.  The paper did not specify fabric content but I'm guessing by feel that it is mostly cotton, a little poly and includes a generous dose of lycra.  It's a beautiful natural/gray marl color, and is satisfyingly substantial.  I decided while still at the store that it would become a pencil skirt.  I resurrected the paneled pencil skirt pattern I had drafted last year (the original, which coordinated with precisely nothing, has long been donated).  Since I have gained a bit of weight since I drafted it, it's a bit tight in the back, but with a longish cardigan I feel good wearing it.  I topstitched all the panel seams with my coverstitch but my thread choice blends so well you can't even tell!


When I finished sewing it the other night I tried it on with half the tops I own and it seriously goes with everything.  That was $2.97 well spent, I tell you what!  In these photos I am wearing it, of course, with my striped Blackwood cardigan.  I love how I feel instantly put together when I throw that thing on.  In fact, I wore it last week on a date night with my husband, with my yellow linen skirt and a belt and my husband remarked that I "really looked put together."  Guess that isn't a look I have been rocking much lately!  And I currently have two cuts of knits on my sewing table waiting to be turned into more Blackwoods.


I love how this skirt totally looks work-appropriate when styled "up," (I actually wore it for work the day after I made it), but that it also works in a relaxed mom style, like so:


In the above photo I am wearing one of the two Kirsten Kimono tees I sewed recently, using my hacked TNT pattern (lowered neckline, side seams swung out).  I had a major brain fart while cutting this one. As I was cutting, I convinced myself that I hadn't properly trued the seams when I hacked the pattern.  Because I don't get enough sleep and had probably had six cups of coffee that day, I started cutting pieces off the sleeve portion of the pattern willy-nilly.  I have no idea what I was thinking, but I undid my forward shoulder adjustment and my sleeves came out way too tight.  


Happily, it's not too uncomfortable to wear, and the fabric is lovely.  It's a 10 oz cotton/lycra jersey I ordered from Sy Fabrics (new to me, found on eBay) and it is substantial and has great recovery. It's very similar to Kaufman Laguna, but is $5 per yard.  I will definitely be ordering more of this jersey from them. 


Sadly, I cannot say the same about the orange jersey (bought from the same company, $4/yard, 7 oz cotton/lycra jersey with just so-so recovery).  I adore the color but it bags out a bit and feels frumpy.  The difference in fit could also have to do with the fact that I had to redraft the pattern from scratch before I cut this one out.  I used a newly printed pattern and one of the many Kirsten Kimonos already in my t-shirt drawer, as a guide, but I don't think I got it quite right.  

I'm just a bit mad at myself right now.

Note to self: NEVER cut a previously used pattern.  TRACE first!  


Even though the orange color isn't really "neutral" or "basic," it actually pairs with most of my bottoms.  I'm thrilled with the functionality of my wardrobe compared to this time last year, and I'm really pumped to sew up the remaining items in my spring sewing plan.  

I'm also excited to participate in MMM.  I am challenging myself to wear two me-made items per day  (this should actually be a breeze since I made all that underwear, though I won't be taking photos of it) and to try not to repeat outfits more than twice during the month.  I think I am probably going to do daily Instagram pics with possible weekly blog round-ups.  

Happy spring!

Friday, April 21, 2017

Boy Tees

I've been making good progress on my spring wardrobe plans, but I had to take a break when the weather warmed up and I realized that G had only two short-sleeved t-shirts that fit him.  I pulled out my trusty Oliver+S School Bus T-Shirt pattern and my knit fabric scraps and got cracking.


These are a size 5 with 6 length for my tall but lean 4-year-old.  I only have the larger size range, otherwise I would have added length to a size 4, but these fit fine.

I decided to make some fun appliqués for the tees.  The star and the lightning bolt on the Flash tee were just drawn free-hand on the paper side of some Heat n' Bond.


The Flash tee is made of a scrap of cotton interlock and the neckband and appliqué fabric are cotton/Lycra jersey.  All the other tees are also made of cotton/Lycra jersey.


The triceratops and Batman appliqués were traced from online images, using my computer screen as a lightbox.  I appliquéd the gray bat (fused to Heat n' Bond) to a scrap of yellow jersey, and then applied Heat n' Bond to the back of the jersey before cutting out the oval free-hand.  It turned out so much better than I expected!


The gray shirt is actually cut from a tee I made my husband last year, (which he ripped a big hole into).  The jersey, a lovely 10 oz cotton/Lycra from The Fabric Fairy, was too nice and too spendy to just throw away. I'm glad I was able to reuse it.  Bonus, I cut G's little sleeves from the original sleeves, preserving the original hem, so that saved time too.  I didn't actually hem the bottom of this one because I wanted to make sure he could wear it next year too (assuming he doesn't rip a hole in it also).  And because I wanted to be done with the shirt.


Here are some rotten iPhone photos of G in his tees.  You can see how long the sleeves are, and that is after I shortened them by at least an inch (I don't actually remember).  The sleeves on this pattern run quite long.


G is thrilled with his new tees.  I'm thinking of making a Robin tee for Niko so they can be Batman and Robin.  But really I just want to get back to sewing for myself.

.

Sunday, April 9, 2017

Ginger Jeans for a spring capsule wardrobe


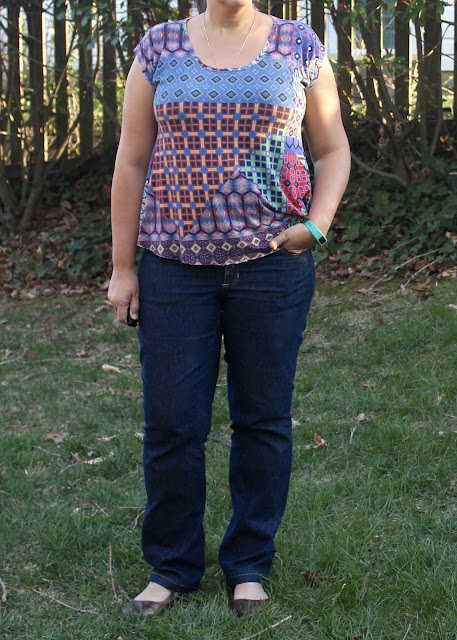
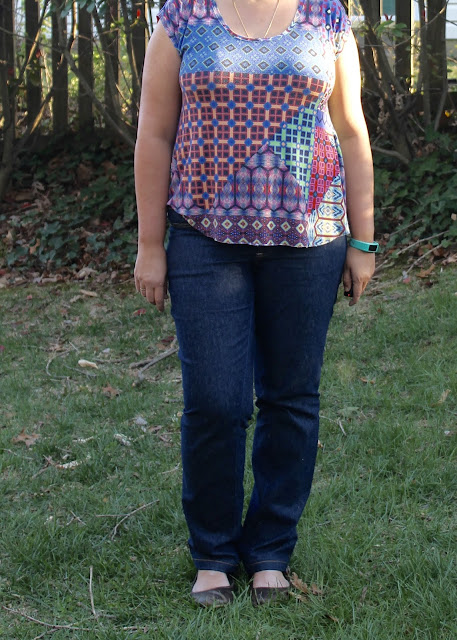
Starting off my spring handmade capsule wardrobe with new jeans sewn from the Ginger Jeans sewing pattern.

Last month I found myself very inspired by the way my striped Blackwood cardigan seemed to invigorate my wardrobe. It goes well with several skirts I had made over the previous year as well as with my first pair of Ginger jeans.  I decided it was time to inject my wardrobe with some versatile basics.  I knew I wanted to use up a cut of navy and cream houndstooth twill that was in danger of languishing in my stash if I didn't sew it soon, and quickly, a capsule wardrobe plan emerged.


These jeans were a piece that I threw in because I knew that I needed them, but I frankly wasn't looking forward to sewing them up.  My first pair of Gingers was a rousing success - they weren't angsty to sew, and I wear them several times per week.  But somehow I had convinced myself in the two months since I made them, that making another pair was going to be hard and arduous.  Especially as I planned to sew them with a proper zip fly, a button and rivets this time.

Starting off my spring handmade capsule wardrobe with new jeans sewn from the Ginger Jeans sewing pattern.

Well.

I began these on a Saturday and I finished them on a Thursday.  My kids did eat the contents of random cans in the pantry and half-finished freezer items on two of those days, so there's that.  Mama needed some new jeans.

These are View A of the pattern again - the low-rise, stovepipe leg version.  I cut these in a size 16 with a scooped out back crotch curve and a higher yoke (I raised it 1" at the highest point).  (With the higher yoke modification, I don't find these to be overly low in rise.  I think any higher would feel restrictive on my tummy, actually.)  They were tiiiiiight.  My previous pair, which I took in considerably, was made out of super-duper stretchy denim.  This pair was made out of a more respectable Japanese stretch denim that holds it shape spectacularly.  I had to let out the waist and hips 1/2" on each side.

Starting off my spring handmade capsule wardrobe with new jeans sewn from the Ginger Jeans sewing pattern.

I tried the full inner thigh adjustment that I fudged on my last pair.  It didn't seem to help my back knee wrinkles much, but it did cause some crazy inseam migration to the front of the leg.  I actually topstitched my inseam with navy thread instead of gold because of how much it twists to the front.  The side seam is perfectly straight, so I know it's not leg twist caused by cutting off-grain (plus I was very, very diligent in cutting my pattern pieces on grain).  Anyway, I guess full inner thigh isn't the main problem.  I ended up letting out the back leg only from the knee down, and that took care of a lot of the wrinkles.  After I did that, I took in the legs evenly at the side seams, from the lower thigh all the way down.  Looking at these photos, though, I think the lower leg is still a little baggy for my taste.  I may go back and take the seams in a bit more.  Like last time, I also found that I needed to shape the side seam to follow the weird curve of my knee, in below the thigh and back out again to the calf, to get rid of some of the wrinkles. Maybe my issue really is knock knees, and not full inner thighs?  Next time I plan to lengthen the inseam by 1" to try to address a possible knock-knee issue.

Starting off my spring handmade capsule wardrobe with new jeans sewn from the Ginger Jeans sewing pattern.

I did not interface the waistband and I used self-fabric for the facing because I wanted it to be stretchy.  I forgot to lengthen the pattern, and so I ended up adding fabric to the bottom for a total of 1" added.  I topstitched it right where I added the fabric, and the addition isn't at all noticeable.  I need to remember, if I ever boot-cut-ize this pattern, to lengthen another inch beyond that at least.

I have to mention how easy it was to install this zipper.  When I read in the instructions that I would likely have to shorten the zipper, I panicked a bit.  I remembered reading blog posts where people had talked about using pliers to remove the metal teeth from the zipper so they could sew a seam and I was intimidated.  But the instructions noted that I could just sew through the zipper - and I did.  And then I shortened it by cutting it with scissors, which blew my mind.  Metal zippers = not so scary.

Starting off my spring handmade capsule wardrobe with new jeans sewn from the Ginger Jeans sewing pattern.

My machine did not like the topstitching thread I ordered from Taylor Tailor - one ply of the thread kept breaking, and then bunching up through the needle.  I did not have this problem with the navy Guterrman topstitching thread I used for the inseam.  I gave up on topstitching thread when it came to the buttonhole and just used regular thread.

Starting off my spring handmade capsule wardrobe with new jeans sewn from the Ginger Jeans sewing pattern.


I think I want to try Heather's larger pocket pattern piece the next time I make these.  I think my back view would benefit from larger pockets.

Starting off my spring handmade capsule wardrobe with new jeans sewn from the Ginger Jeans sewing pattern.

I put three rivets in these jeans at the front but I didn't get any photos of them so you'll have to take my word for it.  They were not difficult to put in, though I found it tedious and time consuming to make a large enough hole through the coin pocket corner, to push my rivet post through.  That probably took me 30 minutes, while the actual hammer-and-cast-iron-pan installation only took five.  No longer afraid of rivets and jeans buttons!

Starting off my spring handmade capsule wardrobe with new jeans sewn from the Ginger Jeans sewing pattern.

I'm feeling pretty good about the rest of my capsule spring wardrobe - now that the most difficult and time-consuming project has been completed, it should be smooth sailing for the five remaining pieces I plan to make.

Starting off my spring handmade capsule wardrobe with new jeans sewn from the Ginger Jeans sewing pattern.

When I took these photos, I had worn these jeans for two full days with zero bagging out.  I didn't put belt loops in because I prefer not to wear belts unless absolutely necessary, and I find that tees lie smoother over a belt-loop-less waistband.  Based on how well this denim has held its shape, I don't think that I will need to add them.  Might have to pick up some more of it - do you think it's acceptable to make two pairs of jeans out of the exact same fabric?  If I did, I'd probably try a mid-rise bootcut variation.

If you enjoyed this post, you might like to read about all the other Ginger Jeans I've sewn (including with a pull-on waistband hack).  You can find those posts here. As always, thanks for reading and I'll see you next time!